Friday, February 27, 2009
Friday Randomness
Like some of my blogging friends and acquaintances have been saying of late, “I gots nothin’” in the way of fascinating blog content for today. I am not burning with passion about a particular issue, and my knitting is fun but just getting bigger, that’s all. So, here are a few tidbits about things I’ve noticed or am interested in these days.
1. Yes, the Kauni Jacket is coming along just fine. I am about halfway up the right half of the back, heading toward the start of the right arm. The stripes are very wide, since there are only 64 stitches on that half. It’s a neat contrast to the thin stripes on the other side. I hope to get quite a bit done over the weekend. And maybe I’ll finish my socks, too. I just have an hour or two left on those socks. Just have to get motivated.
2. One motivation for finishing the socks is that I have the next pattern and yarn chosen. That’s the yarn in the picture--which was hard to locate, because I'd apparently forgotten to add it to my stash on Ravelry--and it's one of my most recent purchases, too! The pattern is called Charybdis. It is so cute, and I’m flattered that I actually inspired the designer to try her hand at designing! I think the yarn will look as good on the pattern as the yarn Fiona chose for her prototype. Heck, if she knitted a pattern I did, the least I can do is knit hers, right?
3. I even have another sock pattern to love. One of the ladies on the Texas knitting list I read posts patterns she finds, like every day. On Wednesday, this one, called Seriously Southwestern Socks, came up. I like it way more than some of the other two-color ones I’ve seen. I think I will try to find a suitable dark semi-solid, perhaps a very dark green, to make this with one of my many lighter colors of indie dyer sock yarns.
4. I’ve been reading a few of my magazines, and I enjoyed the latest Piecework, which came yesterday. If you are a fan of historical re-enactments, you really will want to get this issue. There are socks, a “vest” and a kind of shawl called a sontag, with authentic directions. I did find lots to like in the new Interweave Knits, too. Tonight I will look through it again to see if there’s anything in it I am just dying to make, so I can get yarn for it tomorrow. I’ll let you know if I choose a pattern.
5. Yep, tomorrow Deana, Dawn and I are going to head back out to Paige and Brenham. This time I will have a list of things I am looking for. Since there isn’t enough yarn for many large projects at my LYS, I hope to get a couple of projects’ worth of yarn. I’ve been carefully studying my queue on Ravelry, too.
And here’s a random blogger hint. I’ve noticed that on blogs with word verification, occasionally the word just doesn’t show up. Just type something random in and try to submit. Words will usually appear the next time. I do the verification of comments, because I was concerned at first that inappropriate things might get posted. I did get a spam comment last week, but it has not been as bad as I feared, not at all. I thank ALL of you who have commented lately, too. I learn a lot from you, and I feel better when I read your words of encouragement!
Wednesday, February 25, 2009
Wednesday Wonders #8: Little Old Florida Ladies
It’s Wednesday again, wow. This week I’m not feeling too perky, so this will be just a short sharing of some memories from a long time ago.
During the years I was in college and grad school, my mother was really sick. When I came home to visit, it gave her a lot of pleasure to sit in the family room with me and my boyfriend and watch television while she crocheted and I knitted. I’d eventually turned into a budding yarn snob after an unfortunate incident where I knitted two really nice fisherman’s ganseys from yarn purchased at my mother’s favorite store, only to have them turn into horrible stiff nightmares full of pilling, like only 100% acrylic can.
So, I went and found the local yarn shop of the day, which was a store that sold needlepoint, embroidery and knitting supplies in a little strip mall in Plantation, Florida (and I think it has since burned down). There I found a sweet group of retirees from New York and Canada who were having a wonderful time doing “condo knitting” and marvelous creations using fuzzy yarns. I guess this was the precursor to the fun furs of the early 2000s. These things do go in waves, I think.
They were my first real introduction to yarn that had natural fiber in it. They loved cotton blend novelty yarns and encouraged me to get those. That’s probably because it’s hot in South Florida. But at least they talked to me cheerfully during some hard times at home. And they encouraged me to try new things. I was really grateful to these ladies for encouraging me to continue on the path towards yarn snobbery!
The photo for today is a sweater I made from a pattern I got there. It’s an improbable mix of a cotton/acrylic blend novelty yarn, a 100% acrylic highlighting yarn in navy, and stripes of 100% angora. That yarn sure felt good. And it was so much fun making the big squares upon which the pattern was based. I ad libbed the rather spectacularly unsuccessful extra stripe up near the shoulder. First, it was ugly. And second, it put angora near my face and neck. That sweater tickled me, itched me, bugged me and made me hot. If I wore it in cool weather, I was cold. Oh well, it was yet another of Suna’s learning experiences. I’m rather full up on those today, so I will stop here and send you off on your own knitting adventures.
No links today—I can’t even remember what the name of the shop was!
Tuesday, February 24, 2009
Kauni Jacket Progress
As promised, here’s a photo of the Kauni cardigan’s progress as of Sunday evening. I did manage to drag my knitting to a bar and knit while waiting for my son’s band to do their inaugural performance at an open mic night. It was sweet to see the rockers in their 40s and 50s applauding their hearts out for the 15 and 16 year olds playing 60s rock. And at least I got almost to the end of the vertical half of the jacket! Glad it’s garter stitch so I could knit in the semi-darkness.
The photo is a bit blurred, which should teach me a lesson for only taking one picture that night. I must have moved my hand. But you get the idea. Don’t the stripes look fine? One thing I did to make the cardigan symmetrical was this. On the back, I knit through to the purple part of the striping. That was I think 2-3 inches past where the cardigan divided for the neck. Rather than just picking up on the front from that point on the yarn, I re-wound until I got to the next place in the skein where the shade of red I left off on came in, and made a new little ball, attaching that when it came time to finish the front. Now the front striping will perfectly match the back. There are a few more stitches in the front, so I may go further into the purple on the front, but the sequencing will be the same. If I run out, I know I’ll still have more from where I ended on the back, so I can keep going. That little bit of extra detail makes me happy. I may end up with two partial skeins at the end, but the garment will look good.
And, further good news is that I am positive I have enough yarn for the project! Since I will have two whole skeins left for the other (horizontal) side, I will be able to keep the striping pattern flowing no matter where the first skein ends, too. All good. If I am feeling up to it, I hope to finish the first side and move on to the second this evening.
Monday, February 23, 2009
Some Lovely New Stuff: Drool Time!
Today’s fun: stash enhancement. A kind gift certificate has brought new yarn into the fold without me actually buying any. And I didn’t waste it on anything mundane, either. I’ll be sharing the progress on the Kauni jacket tomorrow I hope, but until then, let’s drool! All these nice yarns came from the Simply Socks Yarn Co. online store, because they were the ones with the sale on the spectacular stuff I show you last.
First we see the Yarn of the Moment, Crystal Palace Mini Mochi, in the 102 colorway, which is mostly reds and purples. I know, it’s probably for ladies in the Red Hat Society, but I like those colors, too, just as colors. Everyone in blogging world loves this yarn, so I had to get some to handle and view for myself! And everyone’s right. The colors are vibrant and happy, and the single-ply fingering weight yarn is way softer than either of the Noro sock yarns. I think this will make much comfier socks than the Noro, though I still like some of the Noro colorways more and since its sturdier, think it will hold up and pill less than the Mini Mochi. Mini Mochi has the same feeling to it that Berroco Foliage had—nice and soft, but because of its nature, perhaps doomed to some pilling and shedding (which my alpaca Wrenna is doing quite spectacularly as well). I’d intended to save the Mini Mochi for socks, but if something more fun comes to mind, it may end up a scarf.
Next come two colorways of Berroco Sox Metallic. I may have mentioned that Tuba Boy asked for purple metallic gloves. I had seen some of this yarn that a friend got at Hill Country Weavers, and thought it would be what he wanted, but of course, they sold out before I had a chance to get any, even though someone offered to pick it up for me long before I’d have made it down there! When I saw that it was available at the Simply Socks Yarn Co. site, I went ahead and got him the purple one (not sure how it came out a bit blurry), and picked up the red one (which has gold metallic in it, ooh), too. I told Tuba Boy I’d make him the gloves to take off to college with him. Heck, even if he ends up in San Antonio, they will be a fashion statement. I will NOT make a complex pattern with the red, I promise.
Now for the really wonderful part of our show and tell. Look at these two hanks of yarn. You can even see their gleam in the photos! You see here Fleece Artist Nyoni, a wonderful blend of wool, silk, mohair and a bit of nylon. It’s only flaw? It’s not superwash, which makes it less than ideal for socks (for people who put theirs in the washer and dryer, anyway). I don’t care—I hand wash them all. But, you see. The wonder is this stuff was half off. You get over 800 yards for the price of a 400 yard hank that would make a pair of socks. These are big enough for a substantial wrap or small shawl! It’s the same blend as their Somoko superwash sock yarn (and I have a very bright yellow/orange skein of that).
Both colors are really something to behold in person. The green is rather bright, granted, and its name indicates it: Bright Moss. But when you look at it and touch it, the green seems perfectly reasonable. I think it would be gorgeous worn with black, or really any solid color. I have a couple of blue tops with bits of green in them that this would go well with, too. Mainly I just want to knit with it. It feels so incredibly soft, drapey, smooshy and perfect.
The second one is called Morgana. It has browns, grays and reds in it, and might not be as versatile as the green, but is still not too loud. There are many patterns that would work for it, too. I might even try to turn it into a vest. Who knows? There’s a lot you can do with 800 yards.
This whets my appetite for some big-time shoppin’ coming up. We are doing another trip to Paige and Brenham next weekend. I am going to carefully pick two things I want to make and TRY to just pick yarn for them, as birthday gifts from Lee, who has authorized this purchase. Wish me luck.
Friday, February 20, 2009
Thinking about Gauge and Swatching
There's not a lot to show in my knitting at the moment. Just think "stripier" and you'll get the idea of how the Kauni jacket's coming along. It's gorgeous, but not fascinating enough to photograph right now.
But since I seem to be talking about techniques on Fridays, I thought I'd share things about gauge that I've been talking to friends about lately (along with a big close-up of some stitches for you to imagine practicing the determination of gauge for). It seems like some of the ideas that I pass along are new to some folks, though I am sure that I have read all of them in one source or another. So, in the spirit of "maybe some blog readers might get something out of this," here goes!
1. Some things you don't need a gauge swatch for. Duh, you say, a dish cloth will work no matter if it's 8 or 8.5 inches wide. And many scarves, afghans and shawls have a lot of leeway as to finished size. But, think about this! I rarely do a gauge swatch for a sock. Why? Well, the gauge swatch is pretty much the beginning of a sock, anyway. So, I take a stab at what I think will work, cast on, and knit the ribbing and an inch or so of pattern. Then I put it on. Does it go over my heel? If yes, it is not too small. Does it stay up when stretched over my calf? If yes, then it is not too big. Most times I get two "yes" answers and can keep on going--my gauge swatch becomes the sock. I would, however, be a LOT more careful with anything involving cables, slipped stitches and stranded colorwork. I'd want to be really careful the eventual sock could get on once it was made.
2. You do not have to make a separate swatch for each different needle size you try. I'm sharing this, since it was news to some people I know. When I am looking for the right needle size for a particular yarn, I usually cast on 35 or so stitches with my best guess then knit a couple of inches and measure. If it is too small, I get a bigger needle and keep going. I use a row marker (a marker you can slip over a completed stitch) to indicate the last row knit with the needles that didn't work. I knit another few inches, then measure again. If that's off, I try again. The most I've ever had it take is 4 tries. Eventually you get gauge or something really close. And I only have one square to unravel and re-use (or to save for another use).
3. Some yarns just won't get the gauge you need for a project and look good. Yep, sometimes you would end up knitting so loosely or tightly with a yarn that it does not look its best. This tells you to go find another yarn or a project that is better matched for the beloved yarn you want. I am truly hoping that will NOT be the case for my Bridget cardigan. Buttons for it are coming. I want to get gauge!
4. If you can't get EXACTLY the right gauge, try what they tell you to do in most garment directions and wash, block and dry your swatch before measuring. You might be able to block it to the exact right size. When I get just a teeny bit off and am using a yarn that has fibers that block well, I assume I can block the finished garment to the right measurements. And, if I have yarn that will stretch a lot, I need to REMEMBER to not make the garment too big in the blocking, like I did on my shiny green sweater I made a couple of years ago and may have done in the recently finished orange sweater. Re-blocking may help. I am thinking of re-blocking the green sweater to make it smaller.
5. Learn whether you knit tightly, loosely or average. This will tell you which direction you'll probably need to go to get the right gauge. I know I knit loosely, so I often need to use two sizes smaller in needles. However, see #6.
6. Gauge for a knitted item is not set by some magic "perfect knitter" who used the exact perfect average tension for an Ideal Knit. No, gauge is set by whoever knit the sample garment. This came as news to me, when I first heard it, but of course it makes perfect sense. If the designer's a tight knitter, what she did on a US size 6 needle I might need a size 2 to duplicate! Remember, regular humans, like you and me, test knit patterns. Some may be 100% average and some may not. This one right here is why you NEED to do a gauge swatch for most things, even if you KNOW you are average and think you "always" do just fine if you use the needles specified in the pattern. You would have a very bad experience if you did that with an item I was the test knitter for! (Actually, when I write instructions, I just go down two sizes from the needles I actually used when I specify the recommended needle size, and so far that has worked well.)
7. Don't forget row gauge! On many patterns, row gauge is not too vital, because you keep going until you get to a certain length, rather than counting rows. But, if you are making something, like my orange sweater, with a motif that needs to finish at the right length for a sleeve to end, or a neckline to start, you'll want the right row gauge. And, of course, if you are knitting a sideways sweater, which I did a couple of times last year and am doing now, row gauge needs to be taken into account. And sometimes you get stitch gauge (width) and not row gauge (height) with a particular set of needles. Figure out which is most important to the pattern you are making!
True Confessions (I am so full of them lately)
I admit I don't often go the whole 9 yards and knit a swatch containing the entire repeat of any lace or cable used, bind it off, wash it as I will wash it in the future, block it, dry completely, then measure the gauge (followed, no doubt by wailing and gnashing of teeth because it's off). But, in any garment I publish a pattern for, I DO give the gauge after washing and blocking. Now, so far, that's just socks and the scarf the top illustration came from, because every sweater I design is too hard even for me to reproduce, as shown by the weirdly colored and multi-patterned example photo. But I WILL be careful to get the finished gauge, not an in-progress gauge when I do publish a garment pattern!
Wednesday, February 18, 2009
Wednesday Wonders #7: Jody Hennings AKA KillerPeach
In honor of her recent birthday, I thought I should honor my erstwhile knitting companion, Jody Hennings, this week. Long-time readers will have been hearing about her for years, but we can always learn more, can't we? So, what's so special about dear Jody?
I met Jody pretty soon after my local yarn shop opened up. She was young, funny and a pretty good knitter. I enjoyed hanging out with her. Then she disappeared for quite a few months. When she came back, she was a GREAT knitter. You see, Jody's mind works differently from some of ours. Where people like Suna have lots of hobbies and dabble in some other things, Jody's mind is compelled to learn everything about whatever takes hold of her interest. She could never be someone who knitted simple patterns to pass the time. No way. She was driven to master the most complex construction methods (whoa, can she do short row shaping on a sweater), the most technical uses of knitting stitches (things she did with cables make yesterday's sweater look like a kindergarten project), and the most artistic possible projects (that woman, she can make lace sing).
The nicest thing about Jody's intense drive for learning is that she has an equally intense drive to share what she learned with her friends. When we all three lived in the same town, Jody would regale Cheri and me with technical details on yarn composition, dye, needles, construction of garments…you name it. It was like our own little University of Knitting. She used to share a lot of this stuff on her blog, and I hope she gets back to it some time, because everyone enjoyed the writings of KillerPeach!
Another wonderful thing about Jody is her generosity. She made me the incredible shawl you see at right as a birthday gift (that counted as a gift for like the next ten years) that I will always treasure. Silk and cashmere, in my favorite colors. Ahh. I wish I had a photo that showed it off better. But that's just the start. How can I ever thank her for buying and then spinning the yarn for my wedding shawl (see below)? She had to mail that yarn from the Netherlands, even!
I've been the beneficiary of a couple of Jody's other intense learning experiences. Though I'd been studying tarot cards and how to use them for many years, her knowledge of it quickly surpassed mine as she immersed herself in that topic a couple of years ago. She found decks I'd never have found for myself, and happily shared all her new ideas and thoughts on tarot.
And we can't forget dyeing. She, Tina and I spent a memorable evening dyeing yarn with KoolAid a long time ago…Tina (Chemical Pink) and I have stuck mostly with KoolAid, but not Jody. She bought wonderful professional dyes and spent long hours perfecting deeply shaded and incredibly nuanced semi-solid yarn. I got enough of one sample to make my Garden Path socks. It's the prettiest brown I ever saw. I hope she is able to actually get that business going, because I'd sure be among the biggest customers.
Then there was spinning (at left is my wedding shawl, of yarn she spun). Once she got serious on that one, she didn't produce lumpy masses of strange colors and textures. No way. She purchased only the loveliest of roving, got her own drum carder, and spun on her incredible new wheel some of the most beautiful yarn I ever saw, with glorious flecks of color or shimmer, but nothing gaudy or overly showy. That lets her knit the yarn up into mind boggling lace and garments. Shoot, I haven't even managed to spin a spindle's worth. I need me a new spinning mentor, that's for sure!
I've mentioned it before, but it was very sad for me when she followed her man to another country last year. It's a great adventure and I am hoping it gives her wonderful memories. But I miss having her around to share whatever new enthusiasm is growing within her. When she is on to a new topic, she's a sight to behold! Get out your notebooks and take notes, Dutch people!
Since I don't get to see her any more unless she has a few minutes during a visit with her family, I'm glad to at least get to look at her work often. Whether it's a shawl on my own stair rail, the lovely things she knit as yarn shop samples, that one pair of socks I have from yarn she dyed, or just the fun photos I have on my computer, she's never far from my mind. I am glad for email, Ravelry, and Facebook, which lets us far-flung friends stay in touch and keep learning from each other! Thank you, Jody, for bringing so much friendship, fun and knowledge to my life. Knit on!
More on Jody
She's KillerPeach on Ravelry
And you might enjoy the archives of Killer Peach, the Blog
Tuesday, February 17, 2009
A Raglan Aran I Made
I thought I’d share a sweater I knitted a while ago, since I just got photos of it. I think I made the sweater the late 1990s, because I made it for my ex-husband, and I don’t think I’d put that much effort into a sweater for him if I knew at the time that he was unhappy in the marriage. You see lovely photos of my friend and singing companion, Bill, modeling the sweater, because the ex didn’t ever wear it (not that he didn’t like it, but he is a warm-blooded Irish fellow and never needs a sweater). Bill chills much more easily, so he is very happy to have something hand-knit and warm. And as a bonus, I get to see the sweater every so often! It all worked out fine. (This contrasts to a Kelly green sweater Aran-style sweater in a sport-weight yarn that I knit in the 1980s for a previous male companion, which I will never see again. I need to look through old photos to see if I took pictures of that one.)
This is one of my favorite things that I’ve made. I used all my favorite techniques: it’s a top-down raglan knit with no seams, and I used real naturally colored wool that I got in Ireland at a little shop in Galway that’s where the people who hand-knit sweaters for wealthy tourists come to bring in their products—I bought some of the wool they use for their sweaters. I also got to use my very favorite complex cable pattern, one that is so wide that you need plenty of stitches to get it to fit. The yarn was not “Aran” weight, but more of a sport/Shetland weight, so I could put lots of stitches on the needles. I also fit the center pattern down the sleeves, and adjusted the raglan shaping to let it go all the way up to the neck. I also like that I used a more interesting pattern than seed stitch on the sides (I guess it’s moss stitch). At the time I was a “thrower,” so seed stitch was a pain in the arm. (I think I switched knitting styles mainly because switching from knit to purl is so much easier with the yarn in my left hand.) I am really happy with the way the pattern on either side of the central motif is balanced. Its simplicity keeps the focus on the majorly complex center.
For sources, I used the Elizabeth Zimmerman Second Treasury of Knitting Patterns book, the one with the cables in it, and Knitting in the Old Way, by Priscilla Gibson-Roberts. As I always did, I used Knitting from the Top, by Barbara J. Walker, to help plan the sweater’s construction. The planning is much of the fun of Aran-style sweaters, anyway. I really enjoy picking motifs, figuring out how to balance them, and seeing how I can make them fit the intended recipient. I do quite a few gauge swatches to make sure I don’t end up with something way too big or too small, since cables really affect gauge. This one worked, though!
It’s a little bulky where the arms meet the body, which is an issue with raglans in general, but it still looks really good on Bill. I’d like to make more sweaters like this, but there isn’t much weather in Texas for wearing really warm ones. This year we had a few weeks of good sweater weather, though, and I got out my felted silk garden raglan and good ole Mr. Greenjeans more than once!
I hope you enjoy this little diversion to focus on an oldie but goodie! I am glad my friend John Phelps, who also did many of our wedding photos, took the time to snap a few shots of Bill in the sweater one day when he wore it to church!
Monday, February 16, 2009
I Can Knit a Rainbow!
Thank goodness I have knitting. When everything else in life seems to be out of my control and I feel like I don’t even understand the English, my knitting is there to comfort me. And even with all my recent backtracking and re-knitting, I still feel like this activity is something I am competent in and that I can be creative with—with some modicum of control (admittedly, some of the stuff I can’t control, like how stripes come out, is what I like best). My knitting was the definite highlight of the weekend.
I got a bit done on my second Converging Ribs sock. You will be pleased to know that my instructions work so far. I’m almost finished converging, so it will be a simple task to finish it, when I stop obsessing over Kauni.
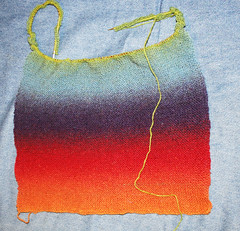
Yes, the thing in the photo has me totally thrilled. Indeed, that is a sizable garter stitch rectangle (with some increasing near the top). But wow-ee that was one fun rectangle to knit. I couldn’t wait to see how the next color would show up. The rectangle is actually the first sleeve of the Kauni jacket (again, it is this pattern , and the green squiggles on each end of it are the first three rows of both the front and back of the vertical side of the jacket.
Of course the striping pattern is going to change considerably now that there are three times as many stitches per row as there were before! I can hardly contain my excitement at the idea of the skinner stripes, and how they will look. Then, when we go to the other side, there will be medium stripes on the horizontal body piece, and thinner stripes on the sleeve. Hee hee. This makes me practically giddy with excitement. Or it would if I wasn’t still feeling overwhelmed from a challenging weekend—one in which I passed by a chance to go to a yarn shop. Yes, I was mere blocks from Hill Country Weavers and didn’t go in (I am so strong in my resolve that, even if I had gone in, I swear I simply would have purchased a longer circular 2.75 cm needle for this project). And besides that, thanks to non-fiber life interfering, I missed seeing the Ravelry founders at the Knitting Nest! That was a real bummer, but family first, as they say.
But wait, have I gone on and on about the yarn I am using enough yet? I don’t think so. This yarn is a great choice for this pattern. No wonder people love it so—how versatile it is! Here’s the cardigan that Stephanie Pearl-McPhee made that got people all hepped up about it. Now, the wonderful Kauni has its issues. Kauni Effektgarn 8/2 is not the softest wool ever plucked from a sheep—which makes sense for a Shetland-style yarn. And there’s lots of grass and twigs in it, but, like I said about Sari Silk, at least it’s exotic grass from another continent (the yarn’s Danish). I really am enjoying watching it knit up, though. And there is so much yarn on the skein! What you see in the photo is about half a skein’s worth, maybe less. I have four skeins, so I’m sure I’ll have enough.
Wishing you holiday greetings, whatever holiday you happen to be celebrating, or have celebrated in the last few days. There are so many to choose from! I send Valentine Love to you all!
Friday, February 13, 2009
Suna's Thoughts on the Tops of Socks
The most important part of a sock, and an often ignored part, is the top edge. Whether it’s your cast-on edge or where you bind off and say, “Ta da, I’m done!” at the top edge, you sure want it to be wide enough to fit around the part of your (or the recipient’s) leg where it will hit.
This sounds simple, but is it? I sure know a lot of fine knitters whose socks look great, but they have trouble getting them on, or they can get them on, but not pull them up all the way. What’s the problem? Are they bad at casting on or binding off?
Heck, I can now admit that I once was one of those people. When I knit my first sock (shown here), I followed the instructions fairly literally, so when it said to cast on X number of stitches, I did so. I used the normal cast on I used at the time, which was the backward loop method. I am not sure, but it may have been the only method I knew back then. Maybe I knew the long-tail method, but it never occurred to me to use it in that context. When I finished that pitiful attempt at a sock (why did I use the darkest possible yarn on it, so I couldn’t see to pick up stitches, or notice when one fell off my tiny double-pointed needles?) I proudly tried it on. Oops. I’m a loose knitter, so thankfully my backward loop cast on is fairly loose, but it does not create a sock that fits the width of my calf easily.
On the next pair or two I paid more attention and cast on very loosely, and even tried casting on over two needles held together, but I didn’t like the way the edge looked that way. Finally I bit the bullet and used a long-tail cast on. Yay, that one is not bad. Still, you need to cast on quite loosely with this method, as well. I used to teach students to cast on over two needles, but often this just made a hideous edge that looks all loose and untidy when the sock is in a relaxed state.
Finally, I came across a pattern that suggested the knitted cast-on. It’s similar to the cable cast on, and is the one I like to teach new knitters because it so closely resembles actual knitting. Once they know how to do the cast-on, they just have to switch to sliding the new stitch off the old needle and on to the new, and they’re knitting!
Now, just doing a knitted cast-on does not lead to the ideal sock. It still has to be fairly loose, which can be a problem for insecure new knitters or people who just knit tightly. In my efforts to come up with a smooth way to do this cast-on, I inadvertently found an easy way to add a bit of looseness without going overboard. Here’s what I do (and actually, I do this for most projects I cast on):
1. Make a slip knot and put it on one needle.
2. Insert the second needle as if to knit, wrap the yarn and pull a loop through
3. Use the second needle to place that loop back on the first needle BUT, do not remove the second needle from the loop.
4. Slightly readjust the positioning of the second needle so that it is once again in the position to start a new stitch.
5. Wrap the yarn around the first needle and pull a loop through.
6. Repeat steps 3-5.
What does this achieve? It gives you economy of motion, for one, because you don’t have to remove and reinsert the second needle, just reposition it. That makes the casting on go more quickly. But more importantly, your cast-on stitches never get tightened over just one needle. You finish the stitch with it wrapped around BOTH needles. I think this is pretty cool, and I hope it makes a wee bit of sense. People get it when I show it to them, but explaining in words may not be enough. Let me know and I’ll try to get a video clip made.
Now, if you want to get all sophisticated, you can try making a cuff, which, when sewn down loosely, works great. If you add a simple picot hem edge (which is just a YO, K2tog every so many stitches), ooh, that is nice!
By the way, this is not the first time I’ve waxed poetic about casting on. I must care about it a lot! In 2007 I wrote a post with information on teaching the cast-on that might be helpful, and I have a short post on pros and cons of three cast-ons that sums up some of this content.
OK, but what happens when you knit a toe up sock and you are ending your sock at the top of the leg? We all know people who bind off so tightly that it affects the shape of their final product. I often suggest using a larger needle to bind off in such cases. That solves some problems, right there.
My favorite option is a variant of a Russian bind off that comes from last week’s Wednesday Wonder, Wendy Johnson. She describes it in this post (just scroll down a little, it’s in the Q&A section). When I can remember how the heck to start it, I think this is my favorite technique. It never ends up too tight and it looks pretty good, too. Try it, you’ll like it!
The EZ stretchy sewn bind-off (this is a link to instructions by Denise Powell) also works well—I just find it too fussy for my taste, takes too long, and requires a darning needle. Just not for me, but great if you like it!
Another fun option that I have used in lacy or otherwise delicate toe-up socks is the picot cast off. I used it on the OpArt blanket I made recently. This tutorial tells you one way to do it. The picot bind-off really stretches nicely but comes back together when the sock is in a relaxed state.
If you want some more fun ways to start or end socks, I must recommend the book that opened my eyes to a world of possibilities, and that’s Cool Socks, Warm Feet, by Lucy Neatby. I vividly remember the day I bought it, at a conference in Kansas City, Missouri with a bunch of my friends. I made all kinds of interesting socks from that book, including one pair with a really cool crenelated bind off (seen here). Darn it, I sold that pair. I need to try that again! And look at that afterthought heel, too!
I'm not sure what got me started on this topic, but I do I hope that some of my suggestions will help you make socks that you can pull up as high as you want without cutting off your circulation! The socks will look more professional, and you'll be proud to wear them or give them as gifts--gifts that will be worn!
Thursday, February 12, 2009
This Makes Me Inordinately Happy
What just happened makes me so happy that I am posting twice in one day. I think I got an inkling of what must constitute my happiest knitting moments.
I was taking a break and looking through the new patterns on Ravelry, because I just like to do that. I'm always on the lookout for that perfect shawl, mitten or cardigan (the obsessions of the moment). I'd been looking at some DROPS designs, from the most prolific Scandinavian pattern makers out there. I'd seen a crazy little pullover from sock yarn that I liked, but as Dawn the Wednesday Wonder had pointed out, it was not a design for "fluffy" people. I was reluctantly coming to the conclusion that perhaps even I am a bit too fluffy for all the stripes in that pattern (I'm linking to a picture of it here , since they own the photo).
Then today, lo and behold, they'd posted another sock yarn sweater, this one a very simple cardigan, half of which was knit vertically and half horizontally. The stripes were busy, but less so than in the other pattern. (Click here to see what I mean.) I debated whether I should purchase 5 balls of their sock yarn to make it. I actually DO want to buy some of their yarn, to thank them for all the nice patterns. But right now, I have that New Year's vow to use my stash nagging away at me.
So, I wandered off to my quite hefty Ravelry stash page to see if there were anything in there that was a) self striping and b) over the 1220 yards I needed for the pattern. I looked at my red and blue Jojoland Melody, which I have way more than enough of. But really, I want that to be a shawl, which I already have one of yer wonderful patterns picked out for and everything. Then...there it was. The yarn I had bought from the place in the Netherlands, because I loved it, but that I didn't want to use to make that same sweater the Yarn Harlot had made. The rainbow-colored Kauni. The beautiful, wool, fingering weight, rainbow Kauni.
What you see in the photo is just SOME of the coloring in this yarn. It's a whole rainbow of nice, long repeats. Perfect for...A CARDIGAN.
And that was my happy, happy moment. The moment pattern and yarn came together in my mind and made something as-yet unrealized, but beautiful. I had a match!
And I think that magical moment of matching yarn to pattern is better than buying yarn, better than choosing a pattern, better than getting gauge, better than the actual knitting of the project, and a long sight better than sewing pieces or blocking!!
Ahh. I will go home and print my pattern and touch my yarn. Maybe I'll even swatch this one AND the revision for Bridget tonight!
I forgot to say this little tidbit about Bridget: I have ordered some hand-made buttons for it. I sent Wednesday Wonder Georgia Morgan a sample of the yarn, and she's going to make me buttons! Won't that be nice?
Converging Rib Socks: How-to
This "sock recipe" assumes you are familiar with making a basic, top-down sock with a flapped heel: I won't be walking you through the heel or toe. You can make these socks with any needle configuration, though I’d find it easiest using Magic Loop or two circulars.
Cast on whatever multiple of 4 stitches will get you a sock width width you prefer, in whatever method you like to use for a good, stretchy cast on. I used 64 stitches and my usual loose knitted cast-on.
Knit the sock leg in K2, P2 ribbing until the leg is as long as you wish. Since I like to have my legs contain a multiple of the entire repeat pattern of any self-striping yarn I use, I did three repeats of the striping pattern in my yarn. This turned out to be a smidge over 6 inches or 15 cm, which is within my usual 6-8” (15-20 cm) sock length range.
Do the heel normally. After you have picked up all the stitches, knit a couple of rows with ribbing on the instep and stockinette on the rest. EXCEPT, if you want your converging ribs to go further down the sock, you can add two purls to the end of the sole stitches. This is what I did, and the rest of the pattern assumes you've added the two purls to what will eventually be the instep.
Next, for ease of knitting and counting, rearrange your stitches to where the sole has half the number you originally cast on (for me, 32 stitches) and the rest are all on the instep side. You will be gradually decreasing this side down until it matches the other half.
For the rest of the sock, the sole stitches just march along in stockinette. You’re not going to do a gusset.
Now you’re going to decrease the instep side by making the ribbing converge in the center. I didn’t center the ribbing, because I wanted each side to swoop in at a different rate. Call me asymmetrical!
DECREASE ROW: Knit the knits and purl the purls until you get two stitches before the center. You should be finished with a P2. Perform a centered double decrease as follows:
Slip the next two stitches TOGETHER as if to knit (both at the same time), K1, pass both slipped stitches over. Continue the instep, knitting the knits and purling the purls.
You’ll see a knit stitch sort of raised up. That’s the center. You’ll always do your decreases with a stitch above that one as the center. Finish the row.
Knit two rows in pattern (purling where you see purls).
Repeat this pattern, one decrease row followed by two no-decrease rows, making sure you do the double decrease by slipping the stitch two rows above your last decrease and the stitch before it, then knitting the stitch after your center, and passing the two over. You will have a nice line in the center.
When you have decreased to the point where your instep and sole stitch counts are the same, change the pattern.
INCREASE/DECREASE ROW: On the next “decrease” row, use a left lifted increase or MI (twisted, so as to not make a hole) between just before the first purl stitch, knit to center and do the double decrease, then do a right lifted increase or MI just after the last purl. This will keep your stitch count even.
Continue in this fashion until you have no more purl stitches. You will finish decreasing away the purls on the left side before the right (or vice versa if you didn't add the two additional purl stitches). That’s fine.
SINGLE DECREASE ROW: When there are no more purls on the left, only increase on the right and use K2tog in the center (or, if you didn't add the purls, do a SSK with the center stitch and the one following it and only increase on the left). Soon, all the ribbing will be gone!
You’ll have a fun pointed front to the sock. Finish as you would any other sock, starting the toe decreases after the sock covers your little toe. You can do any toe style you prefer.
Why do we decrease every third row rather than every other row, like you would on a standard sock gusset? It’s one of those things Cat Bordhi writes about in her “New Pathways” patterns with all the unique ways of increasing or decreasing for sock insteps. It just gets too tight along the instep if you decrease two stitches every other row. So, rather than knit a tourniquet, like I did the first time I tried this pattern, take it from me and decrease every third row. Instep comfort is also why I asked you to knit two rows with no decreases after the heel. If you have a high instep, consider starting the decreases later OR decrease every fourth row the first few times.
Other ideas: You could easily do this centered decreasing on socks with no ribbing. You’d still get cool curves. Or you could do K1 P1 ribbing. You might want to put an odd number of stitches on the instep, so your center stitch would be a continuation of the center K1 rib. If you have a high instep, consider starting the decreases later OR decrease every fourth row the first few times.
Let me know if you have questions. You can leave a comment on this blog post, or contact SunaSAK on Ravelry.
Wednesday, February 11, 2009
Wednesday Wonders #6: Alice Starmore
I think it’s time to talk about one of my more controversial early knitting influences, whom I have never met (nor do I expect to!). Nonetheless, the work of Alice Starmore has had deep and long-lasting influence on my understanding of knitting as an art, as well as a craft. And just looking at her work, reading articles about the creative aspects of her life, and learning about her have enriched my creativity and sense of adventure.
In case you have never heard of her, Starmore was a very influential knitter in the 1980s and early 1990s. This was at a time when people were very interested in ethnic patterns, especially those from the British Isles and Ireland (note: don’t tell an Irish person they are British unless you are looking to enjoy a nice, long history lesson—trust me, someone who was married to an Irishman for 14 years). Starmore, who lives on the Isle of Lewis, a place full of rocks, sheep, and apparently wool mills and printing presses, wrote and photographed numerous large, beautiful books of patterns at this time. She dealt with Aran patterns, Fair Isle techniques and fishermen’s sweaters of various traditions. Just what I wanted as a chilly Floridian stuck in Illinois!
I devoured her books, loving all the history, explanations of techniques and endless charts and motifs that you could use in your own creations. I loved that you didn’t have to just knit the patterns in the photographs—you could figure out your own unique creation once you read all of her helpful hints and instructions. Admittedly, the gorgeous settings for the photos often distracted me. I’ve felt an overwhelming affection for some vague “Celtic Homeland” my entire life, even though my background is only partially from there (I also have felt a kinship with Japan since I was a tiny child, and I am not at all Japanese). Starmore’s books (and all the other wonderful books on ganseys, Arans and such that came out at this time) really soothed my inner Brighid (Celtic goddess of spinning, poetry and the hearth).
I bought graph paper and designed my own Fair Isle sweaters, hoping that my color selections would be as beautiful as hers. Well, they weren’t. And of course they weren’t. In my 20s I did not have much “spare” cash, no local yarn shop, and few mail order resources. I couldn’t get the right yarn! So, I made to with mill ends I bought at a place called the Yarn Barn (there are LOTS of places called the Yarn Barn, I know) in Columbus, Ohio. I bought all these huge cones of rough, scratchy wool, probably from making rugs. But I knit them into some of the warmest sweaters possible. And I wore them in Illinois winters! Now they sit on a shelf, waiting for me to go on an Arctic cruise or something, other than the time I drug them out to photograph them for Ravelry (as seen on this blog post!). I also made a few really nice Arans, one of which went away with its recipient, and I seem to have never received copies of the photos I recently took of the other.
Thank goodness Starmore encouraged creativity and doing your own thing. I had to knit at a much larger gauge than she did, but I felt empowered to create. It got me through some lean times. It’s funny that, now that I can buy the right yarn, the only Celtic thing I’ve made in the last few years is a Faroese-style shawl made from genuine Shetland wool yarn, from the Jamieseon & Smith mill.
Now, I know there’s a downside to Alice Starmore. Knitters are very sad that her books have gone out of print and she will not share the copyright and that there have been other supply issues that had some folks in a tizzy at one time(that’s a gross over generalization of a longer story that you can read one viewpoint on here, as long as you bear in mind that there is more than one side to every story). However, there is good news! Alice Starmore’s Book of Fair Isle Knitting is going to be reprinted in the fall!
This is really good news, considering that her Aran Knitting book’s lowest price on Amazon is $225. Let’s hope more of her great ideas become more widely available soon, so the current generation of knitters who love beautiful colors and textures can learn from this amazingly talented woman. There’s certainly a popular demand. I know I spend a lot of time wishing I’d had more money during the years those books were coming out, so I’d have them all!
Starmore’s been doing more interviews for knitting magazines and sharing more new patterns in the last year or so (you can find out about some of these on her website, linked below). I’m hoping that some of the litigation, complaints and discord is over and that we can look forward to more great ideas and beautiful images from her--I don't know about her, but I hate spending my creative time on “business” stuff--which is no doubt why I don't run a yarn shop or publish patterns! She is now doing “fine arts” (I guess that means things that are not “crafts”) and publishes books and distributes yarn. So, she’s been busy! I am just glad that she had the time, knitting and photography skills, and patience to share so much with the rest of us during what was a bit of a long drought in knitting popularity.
More on Alice Starmore
Alice Starmore website
Virtual Yarns (get her yarn here)
Books on Amazon.com
Bio on Wikipedia (not much there)
The Alice Chronicles: story of why people were upset with her
Tuesday, February 10, 2009
Kreative Blogger Award, Thanks!
What a surprise! My crocheting genius friend (and person I know in real life) Judy nominated my blog for the Kreativ Blogger award. What it lacks in spelling (unless, of course, it's from Germany, as Yvonne points out) it makes up for in niceness! When you're just a regular person blogging about your regular ole knitting, you don't expect awards, so this is really a pleasant thing!
Sometimes it's just nice to know that people appreciate what you do. After all, bloggers spend a lot of time doing stuff to blog about (that is important), taking reasonable photos (some doubt that with respect to mine, ha ha), and writing what they hope will be interesting words about their crafts, passions and lives. If you know some people whose blogs make your day, why not give them a nice award to remind them that people are out there enjoying their work?
My nominees (chosen from among my list of knitting bloggers, not meaning to snub the others, of course) are: Dragonfly, Trine, Barb, Lynn, Gena, Emily, Jen, and Becca. These bloggers are women from near and far whose blogs I really enjoy and who bring me not only knitting fun, but also humor and excellent writing to enjoy. I see some of these women often, and will probably never meet others. I'm sure some of them don't even know I exist, but they still bring me joy and brighten my days. Of course, I love pretty much all of the bloggers I read, and I sure read lots!
On a related note, when I was looking through Bloglines to see who I'd nominate here, I was saddened to notice that many blogs I used to enjoy are no longer active. I know it takes time, but I do miss the "voices" of some of these talented men and women (and I would like to thank a couple of my friends who have at least put SOMETHING up this year after I whined at them). Whose long-lamented blog do you miss most?
Fine Print for Those I Nominated:
Here are the rules for the nominees:
1. Copy the award to your site.
2. Link to the person from whom you received the award.
3. Nominate 8 other bloggers (or more!).
4. Link to those on your blog.
5. Leave a message on the blogs you nominated.
Saturday, February 7, 2009
I Am Suna, Hear Me Groan
Wow, my knitting luck is not good lately. What you see pictured it my first try at doing something fun with this pair of socks. I decided to do the gusset in the center rather than on the edges.
It looks OK here, but when I put it on, there was an absolutely atrocious ladder in the center. I'd done SSK, K2tog in the center, and the transitions didn't look nice.
So, I frogged the sock back to the heel and tried again. This time, I did a slip two together as if to knit, knit one, pass two slipped stitches over center decrease. That made a really cool looking vortex of converging ribs (in fact, I named the socks Converging Rib Socks) that didn't quite meet. I hope they look like arrows pointing inward or something. The curve on the edge was very pretty. I felt good. That is, I felt good until I tried the socks on. They were, um, more of tourniquets than socks. Tight as a blood pressure cuff. I was confused. How come socks are just fine when you decrease two stitches every other row (sorta) when making a heel gusset, but doing the same amount of decreasing in the center didn't work? What gives, I wondered.
Then a little voice played a tape in my head, which is what happens when I remember something I read. It told me, "Cat Bordhi says to decrease every third row on all her cool socks." Oh, um, yes, she does, doesn't she? I am thinking that perhaps she has a reason for that. Like trial and error showed her it gets too tight otherwise.
So, sighing deeply , perhaps even groaning, I ripped the socks back AGAIN (which also caused Pat at the LYS to gasp). This time I did the centered double decreases every third row. The curve was more gradual but you could see it happening. And when I got to 32 stitches, I tried on the socks. Yay, they went on my foot! They are still a bit on the snug side, but not bad. Whew. Now, by the time that I hit 32 stitches, I had not gotten rid of all the ribs, so I continued to decrease, but at the edge of the last P2 on each side, I'd do a lifted increase, to keep the same number of stitches on the needles. It looked pretty. I'd already experimented on which stitch to do the increase on (doing it on the purl made a hole), so I knew this would look OK.
Here's a picture of how it looks on my foot. I hope you can see the decreases. Tomorrow or the next day I hope to show you a completed sock in my weird little new pattern. I'll have to get someone to take a "front of foot" shot. I must say, all this thinking is probably not worth it, but I felt like trying something new, and that does usually take a few tries. This is not as depressing as knitting a simple cardigan back and having it end up 2" too small. That still makes me feel pretty dim.
I'll re-start Bridget this week, though. Not to worry. I won't give up like I seem to have done on my purple crocheted cardigan. The photo below is a side view. I realize you can't see the ribs at all, but it is interesting, I hope, to see that there's no gusset, but the sock decreases to where the foot fits fine!
Wednesday, February 4, 2009
Wednesday Wonders #5: Wendy D. Johnson
Regular readers of this blog are probably not surprised to see this Wednesday Wonder, because I don’t hide the fact that Wendy Johnson is one of my favorite knitting “personalities.” It’s more than just a case of “I like her sock designs,” though. She’s done a lot of things that have helped me as a knitter and a person, so what the heck, here’s her little tribute.
I first learned about her reading a sock knitting email list a few years ago. It was during the time when my long-term job was going away and I was trying to find something else to do, so I had plenty of time to read Yahoo lists to my heart’s content. I found a lot of the blogs I currently keep up with there, so I am glad I did it, even though now I only get to check in once or twice a week to make sure that, yes, they are still answering the exact same questions over and over again from new knitters who can’t be bothered to read the FAQs (hint: I am impatient with people who don’t read FAQs before posting).
Anyway, a few people mentioned Wendy’s sock patterns as having good techniques in them, so I took a look. I think I was trying to find a reasonable toe-up pattern. When I first read one of her sets of instructions, I felt such relief. Here was someone who actually proofread her work, wrote instructions in language more than one type of learner could understand, and made sense. Her sock patterns weren’t so terse I had to fill steps in from knowledge I already had, but they weren’t so wordy that I couldn’t tell what she was doing at any time. After the first pattern, I kept going and made pretty much every free pattern on her blog. And when she started selling patterns on the Loopy Ewe site, I got some more.
Anyone looking in my Ravelry projects page will see a LOT of socks from her patterns (here is one example), and others that use her patterns as inspirations. I particularly love her toe-up flapped heel. I love it so much that I wrote it on a little card so I can remember how to do it in socks I am making up for myself. It’s always in my sock bag! Wendy thinks like I do, so I understand where she’s going in a pattern and don’t have to think too much once I’ve got it down. And there aren’t too many surprises to mess me up. When I write my own patterns, I try to emulate her style and hit that middle ground. I've really learned a lot about writing knitting patterns by reading hers. Thanks, Wendy!
I always enjoy Wendy’s blog (even though I have admitted in public that the “cat picture a day” technique is not for me, I do see that for her, the Lucy picture a day thing a good publicity technique and something that people will remember to come back for). She shares just enough detail about her life for you to be reassured she’s a regular person, just like you, but she doesn’t bog you down with whining and moaning (unlike me in my personal blog, ha ha). She answers people’s questions with grace and humor, and is invariably positive and enthusiastic, even when she’s sick, hurting or frustrated. It’s a good attitude to emulate. She strikes just the right balance between accessibility and privacy, which has to be harder and harder to do when you are writing books, speaking at conferences, and thus becoming more of a “celebrity.”
I am rambling more than I intended to here. My main point is that Wendy Johnson is a Wednesday Wonder because she has a real knack for explaining sock knitting techniques and has been very generous with sharing her ideas with the greater knitting community. She deserves all the good things she can get—for sure I’ll buy her book when it comes out, and if I had time off, I’d be running to that Sock Knitters Summit she’s working on. If you have never knit any of her socks, I strongly encourage you to give them a try. I’ll give you a link so you can find them!
Links to Wendy Johnson
Wendy Knits Blog: http://wendyknits.net/ (there are some free patterns in there)
Wendy Knits: My Never-Ending Adventures in Yarn: http://www.amazon.com/Wendy-Knits-Never-Ending-Adventures-Yarn/dp/0452287324
Socks from the Toe Up (upcoming book): http://www.amazon.com/Socks-Toe-Up-Essential-Techniques/dp/0307449440/ref=sr_1_1?ie=UTF8&s=books&qid=1233778143&sr=1-1
Tuesday, February 3, 2009
Finally, Spring Rib Socks! And Extreme Close-Ups!
Our first extreme close-up is of the socks I just finished. The pattern is called Spring Rib socks, and I got it on Ravelry. The close-up shows how beautiful the Creatively Dyed Luxury yarn is (and I have already gone on and on about it in previous posts, so I'll stop). It also sort of shows the cable. It's got a seed stitch border, then a little cable. It's on the outside of each sock.
I will say that I modified the pattern a lot. So much so that the second sock is just one of my standard top-down socks with the cable pattern placed on the side to match the other one. I was too lazy to repeat the complex sizing things I did to the first one. And heck, you can hardly tell the difference.
Here's one of the socks in a more normal view. I made them rather short, because there is only 360 yards in a skein of this yarn, I guess so it wouldn't cost too much, given its content. In the end, I had quite a bit left over. I could have made them at least two inches longer and still had leftovers! I guess these will make pretty additions to my mitered square blanket that I haven't worked on in a long time (but a bunch of my knitting friends started their own versions recently, making it hard to resist working on it--but I want to wait until I got more samples).
I did a better job grafting the toe on the second sock, but I think I pulled the yarn too tight, due to using the knitting needle method of grafting. I'll keep working at it. At least this one looks "proper."
This extreme close-up is the sock I started today. I just don't feel like doing a complex pattern, as I mentioned yesterday. This tweed yarn has a base of white with a blue strand, which has been overdyed with black, red, orange, purple and pinkish. It's Lana Grossa Meilenweit Colortweed that I got at the LYS some time ago. Very happy, I'd say.
The funny thing is that after the Creatively Dyed socks, this yarn felt all scratchy and rough. I haven't knit with "normal" sock yarn in so long I forgot what it felt like! Actually, this is sort of scratchy for sock yarn. I figure that means it will wear well and last a long time. Fun knitting, not knitting that is a test of skill and intellect. Everyone needs that sometimes!
This extreme close-up is the little hat from yesterday up close, since EMJH had asked to see what the topknot looked like. If you look at the original, you can see the individual hairs on the Blossom. It really is a cute little design element, where it gets small then gets bigger again. Easy! the last two rows are in the fuzzy yarn, which makes the flower effect.
Sunday, February 1, 2009
I Totally Messed Up, But, Here's a Hat
Oh, woe is me. I completed the back of the Bridget Cardigan. Then I measured it to be sure it was still on target. To say that it was not is an understatement. The width at the chest should have been 19" and it was 17". The bottom edge was right, but my gauge was 23 stitches per 4" not 20. I had rather completely departed from my gauge. Craptastic. I knew the yarn was a borderline DK weight in the first place, so I guess I need a larger needle. Luckily I have a lot of yarn, so I'll just start again with a larger needle. I think this time I may go ahead and make the body all in one piece, too. I'll know if it's going to fit much sooner that way. I'll then make the sleeves seamless, as well. Bummer. I just sat there yesterday afternoon and stared at the knitting for a long time. I know everyone has stuff like this happen, but, sigh. I wish I had figured it out sooner. Oh well, another fine Learning Experience for me to learn from!
Remember this--even pretty good knitters, including ones who make gauge swatches, end up with a wrong size and have to start again. it's not the end of the world. Just a tad tedious.
To make myself feel better I decided to make a cute hat, using a very simple pattern and yarn I am familiar with, so I couldn't mess up. It turns out that a student had asked me to help her get started on a hat yesterday and picked a pattern out of the booklet "Noro Revisited," by Cornelia Tuttle Hamilton, which had been lounging in the LYS for quite a while. I showed her how to do it in one piece and use mattress stitch to finish it, and since I still had gift certificate money, I decided to get yarn to make myself one, and I also bought the booklet. Once I got home and saw the disaster that was Bridget (and today is her feast day, too, poor dear saint), I decided I needed to cheer myself up and make the hat. I used this very bright Kureyon colorway along with Blossom in a color that perfectly coordinates. Blososm is an odd little yarn. There's a very solid core and all sorts of fluffy surroundings. It is only used in the middle of the hat. But, it looks really nice. I got a kick out of the top of the hat, a little tube that gets bigger and looks like something a character in a Dr. Seuss book would wear. I think there should be a little flower growing out of it.
It's a nice, warm hat that fits perfectly, so I am sure I'll wear it. I have another really cute hat I want to make, too. I do not in any way need this many winter hats. I do wear them on cold days, especially if I have to de-ice the car. But, I could probably do with one hat per coat. That's about where I am now. But they cheer me up. Nothing wrong with that!
I'll re-start Bridget this week. First I think I'll finish my poor socks. I am at the toe now. I am ready to do another pair, for sure. I think I'll make something simple in a happy colorway. That seems to be the theme of the moment in my knitting!
Subscribe to:
Posts (Atom)