
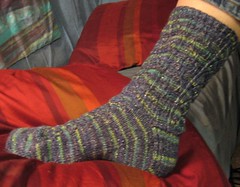
Rainy Day Socks
This sock is based on two patterns from the Harmony Guides. The neat thing is that each pattern has a twelve-row repeat, so it's easy to keep track of what row you are on, even when doing both patterns.
In the new edition edited by Erika Knight, the patterns are Parasol Stitch on p. 74 (modified) and Raindrops, on p. 111 (also modified and with twisted knit stitch border added). The yarn I used on the original socks was mostly blue, like water, with a little green, and featured shiny silver strands, making it look wet. Socks for a rainy day!
Materials: Blue sock yarn. I used Schoeller and Stahl Fortissima Colori Socka Disco Colori, Color 01. This has been discontinued, so use any sock-weight yarn that looks rainy to you and gives the right gauge. It will look a LOT better in a solid or semi-solid yarn, so you can see the patterning.
Gauge: 9 stitches per inch.
Needles: Use whatever needle gets you this gauge. I needed a 00 with my yarn, but most people will probably need a 1 or 2. Whatever needle works best in 64-stitch socks for you will work fine.
Directions
I assume you are using the magic loop method or two circular needles. If you are more comfortable with four double pointed needles, put half of each side on each needle; there are an odd number of stitches on each side, so put one more stitch on two of the needles.
Cast on 28 stitches, 14 per needle, using your favorite invisible cast on, such as Figure 8, Turkish, backward loop (here are my instructions) or Judy's Magic Cast On.
Increase one stitch at each end of the needle every other row until you have 64 stitches. Options include knitting into the front and back of the edge stitch, working a Make 1 (M1)between the first and second stitches and next-to-last and last stitches on each needle, or doing paired lifted increases on each end. I use the M1 method, since my M1s are practically invisible.
On the last row of plain knitting, set up for the pattern on the first needle (this will be the instep). On the last row of plain knitting, set up for the pattern on the first needle (this will be the instep). K8, place marker, K8, M1, K8, place marker, K8. The other needle will be your sole. K16, M1, K16. 33 stitches on each side for a total of 66 stitches. The other needle will be your sole. K16, M1, K16. 33 stitches on each side for a total of 66 stitches.
Start parasol pattern (see below).
Knit to marker, knit row 1 of parasol pattern, knit to end of instep. Keep foot in stockinette, Continue knitting the parasol pattern on the instep.
Shape Gusset
When foot measures approximately 3" short of desired foot length, start gusset. Continuing in parasol pattern on the instep, increase one stitch at each end of the sole needle every other row. I used paired lifted increases, with a right-slanted increase on the right and a left-slanted one on the left. I did the increase on the second stitch from the end. You can use M1 (Make 1) or Kfb as well. Continue until you have a total of 55 stitches on the sole needle.(Don't worry about where you are on the parasol pattern. No matter where you end up, you will start new parasols on the back of the socks when you get to your next row 1.)
Turn Heel
Working back and forth on only the foot stitches:
Row 1: (RS) K 37, Kfb, K1, wrap and turn
Row 2: (RS) P 22, Pfb, P1, wrap and turn
Row 3: (RS) K 20, kfb, K1, wrap and turn
Row 4: (RS) P 18, Pfb, P1, wrap and turn
Row 3: (RS) K 16, kfb, K1, wrap and turn
Row 2: (RS) P 14, Pfb, P1, wrap and turn
Row 3: (RS) K 12, kfb, K1, wrap and turn
Row 2: (RS) P 10, Pfb, P1, wrap and turn
Row 2: (RS) P 22, Pfb, P1, wrap and turn
Row 3: (RS) K 20, kfb, K1, wrap and turn
Row 4: (RS) P 18, Pfb, P1, wrap and turn
Row 3: (RS) K 16, kfb, K1, wrap and turn
Row 2: (RS) P 14, Pfb, P1, wrap and turn
Row 3: (RS) K 12, kfb, K1, wrap and turn
Row 2: (RS) P 10, Pfb, P1, wrap and turn
You will have 63 stitches in total. On RS, knit to end of the needle, knitting each wrap together with the stitch it wraps. Knit across instep stitches, keeping in Parasol pattern.
Heel Flap
Row 1 (RS): K47 (knitting each wrap together with the stitch it wraps), SSK, turn
Row 2: Slip 1, P 31, P2tog, turn
Row 3: [Slip 1, K1] 16 times, SSK, turn
Row 2: Slip 1, P 31, P2tog, turn
Row 3: [Slip 1, K1] 16 times, SSK, turn
Repeat rows 2 and 3 until all side stitches have been worked.
Rearrange for Leg
Move all stitches before the first marker on the instep to the heel needle (this is easy in Magic Loop--just change where the loops are by putting all the stitches together then re-pinching to make new loops where you want the half-rows to end). K across all these stitches, knitting two together where the heel and instep stitches meet.
Knit the next row of the Parasol pattern. Move the first 8 stitches of the heel needle onto the instep needle. Knit across these stitches, knitting two together where the heel and instep needles used to meet (neaten up if you think a hole might form).
(If you are using DPNs, you could put one pattern on each of four needles. That would make it easy to tell where you are.)
You should have 32 stitches on each needle (if not, adjust on the next row). One is the front (it has the pattern on it) and one is the back. The first 17 stitches on each needle will be worked in the Parasol pattern, and the second 15 stitches will be worked in the Raindrop pattern. Place markers between the patterns.
Until you reach row 1 of the Parasol pattern on the front, K across the 17 Parasol stitches on the back of the sock. Until you reach either row 1 or row 7, purl across the 15 stitches of the Raindrop pattern. You can start the Raindrop pattern on either Row 7 or Row 1. When I made mine, I only had to do this for two rows, because my last Parasol row had been Row 10. What row you end up with will depend on your foot size and your row gauge, so it will vary.
Establish Leg Patterns
At your next Row 1, start the Parasol pattern in the section with a K background and the Raindrops pattern in the section with the purl background. Though you have shifted the needles, the parasols will be centered on the front and back of the sock, and the raindrops will be centered up the sides. From now on, it's easy!
I moved the last purls of the Raindrop pattern to the beginnings of each needle so I would not have to start a needle with a YO on Row 1, but if you are comfortable starting with a YO, you don't need to do this.
Continue until the legs are as long as you want, probably between 6 and 8 inches long, ending at Row 12. Do the following finishing rows:
Row 13: In the Parasol sections, K 6, YO, SSK, K1, K2tog, YO, K6. In the Raindrop pattern, keep the twisted Knit stitches going, but Purl all other stitches.
Row 14: In the Parasol section, K7, Do the centered double decrease, K7. In the Raindrop pattern, keep the twisted Knit stitches going, but Purl all other stitches.
Ribbing
Finish with a K1, P1 ribbing. It looks nice to twist the knit stitches. I did 8 rows. Note that the Parasol pattern will cause the socks to dip festively in the front and back.
PARASOL PATTERN (17 stitches--only rows 11 and 12 will have accurate stitch count)
Row 1: YO, (K1, P3) 4 times, K1, YO
Row 2 and all even rows: K
Row 3: K1, YO, (K1, P3) 4 times, K1, YO, K1
Row 5: K2, YO, (K1, P3) 4 times, K1, YO, K2
Row 7: K3, YO, (K1, P2tog, P1) 4 times, K1, YO, K3
Row 9: K4, YO, (K1, P2tog) 4 times, K1, YO, K4
Row 11: K5, YO, K1, (Centered double decrease,* K1) twice, YO, K5
Row 12: K
Row 2 and all even rows: K
Row 3: K1, YO, (K1, P3) 4 times, K1, YO, K1
Row 5: K2, YO, (K1, P3) 4 times, K1, YO, K2
Row 7: K3, YO, (K1, P2tog, P1) 4 times, K1, YO, K3
Row 9: K4, YO, (K1, P2tog) 4 times, K1, YO, K4
Row 11: K5, YO, K1, (Centered double decrease,* K1) twice, YO, K5
Row 12: K
*Slip two stitches together as if to knit, knit 1, pass the two slipped stitches over the stitch you knitted..
RAINDROP PATTERN WITH BORDER (15 stitches)
Row 1: P1, K1tbl, P5, YO, P2tog, P4, K1tbl, P1
Rows 2-6: P1, K1tbl, P5, K1, P5, K1tbl, P1
Row 7: P1, K1tbl, P2, YO, P2tog, P4, YO, P1, K1tbl, P1
Rows 8-12: P1, K1tbl, P2, K1, P5, K1, P2, K1tbl, P1
Rows 2-6: P1, K1tbl, P5, K1, P5, K1tbl, P1
Row 7: P1, K1tbl, P2, YO, P2tog, P4, YO, P1, K1tbl, P1
Rows 8-12: P1, K1tbl, P2, K1, P5, K1, P2, K1tbl, P1
Abbreviations
K: knit
P: purl
Kfb: knit into the front and back of the stitch
Pfb: purl into the front and back of the stitch
M1: make one
YO: yarn over
P2tog: purl two together
P: purl
Kfb: knit into the front and back of the stitch
Pfb: purl into the front and back of the stitch
M1: make one
YO: yarn over
P2tog: purl two together
Special Stitch
Centered double decrease: Slip two stitches together as if to knit, knit 1, pass the two slipped stitches over the stitch you knitted. This makes three stitches into one, and keeps the center stitch at the foreground.
Copyright 2007 by Sue Ann Kendall. Permission is granted to reproduce this pattern for personal use only.
I added this pattern to Ravelry so I could queue it! I used your name, I hope that's OK?? If not you can edit it or I'd be happy to. It's a lovely sock! And I really like how the patterns have a "theme." I'll be on the lookout for sufficiently aqueous sock yarn, for sure!
ReplyDeleteoh, suna, this is lovely... wish I had just more time on the moment...
ReplyDeleteeuhm.... do you knit it on two needles!
ReplyDeleteI was going to add it to Ravelry today, so you saved me the trouble. I'll go put my pattern on my own version! Thanks for the nice comments.
ReplyDeleteOh, and Yvonne, I knit it on one needle using Magic Loop, but yes, it could just as easily be knit on two. If you knitted it on four, you could put each pattern section on its own needle when you get to the leg. I'll add that.
In the intro you said 2 double pointed needles. Did you mean two circular needles? This is how I prefer to knit, I am all thumbs with DPN's. Could you please clarify that for me as I am just learning socks and will undoubtedly screw something up outside of my needle choice.
DeleteThanks so much for posting this pattern! Beautiful!
ReplyDeleteThanks to Robby for finding a typo in the first row. That will help anyone knitting these actually get a real sock!
ReplyDeleteI meant two circulars--thanks for pointing it out--I'll edit it today!
ReplyDelete