Friday, October 5, 2007

Teaching Knitting: What Is Knitting Literacy?


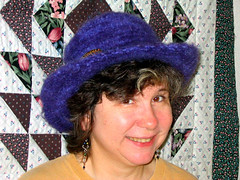
Blue Felted Hat
Originally uploaded by sunasak

Suna of 2003 in a very simple felted hat that she made 12 of in 2003 asks, what skills should the beginning knitter know before setting out for more knitting adventures? For example, this hat only requires that you know how to knit in a circle, cast on, knit, and decrease. Is it a beginner pattern?

(And by the way I sure wish I could find the source of that pattern again--I guess the website is gone--good thing I printed one.)

Knitting Literacy

So, once you have the new knitters casting on, knitting, purling and casting off, what other knitting skills do they need to know? Opinions may vary, but I like to try to teach, or at least show, them these things, especially if the beginning class is a series:

1. Knit into the front and back increase.
2. Knit 2 together decrease
3. Yarn over increase
4. Slip, slip knit decrease
5. Changing to a new skein of yarn
6. Slipping the first stitch on the edge of a piece
7. A simple 2-stitch cable
8. Picking up stitches
9. Common stitch patterns: seed stitch, ribbing
10. Make 1 increase (this can be tricky, so only do it when you think they are ready)

How do you teach them all? I like creating a sampler dish cloth where each technique can be practiced. I often just make one up, but having a pattern to give out would give the students the chance to learn to read patterns and familiarize themselves more with the abbreviations and terms used in knitting patterns.

Hints for Teaching the Skills

When teaching SSK, clarify what slipping "as if to knit" means and show why it matters. You can introduce the saying, "knit now, purl later," which means you slip as if to knit if you are making something now (like an SSK) and as if to purl if you are doing something later (like slipping stitches to a holder, or slipping for a mosaic pattern).

When teaching yarn over, also show them what to do with an extra misplaced one (drop it and distribute the extra yarn across a few stitches). Then show what to do if you realize you forgot one while on the next row, which is to grab the "bar" between stitches and not twist like you would for M1. This will leave a slightly smaller hole, but it will do.

For picking up stitches, let them know a crochet hook can be a helpful tool.

[I will add more here later]

Why am I listing all these things? Because really, to make any sort of project with shaping or patterning, you will need to be able to increase, decrease, and manipulate stitches. I know it can really be frustrating to people teaching classes in a project who find out the students don't know any increases or decreases, etc. Of course there are many other ways to increase, decrease and manipulate stitches, but it helps to go into a project class with basic knitting skills--it makes it easier to learn more specialized or advanced techniques.

So, if you turn out a beginning knitting student with many or most of these skills, the teachers of their future classes (remember, that could be YOU) will be very thankful. You will have created crafters who are knitting literate!

Hey, Thanks

I am getting really useful suggestions for lace wedding tops. Please keep thinking of ideas and posting them to my October 4 blog entry! Think of me if you run across anything that might be appropriate in a pattern book or other source as well--I have so many that there's a good chance I own it and forgot about it. Or I could get it!

PS: I was awfully sleepy when I wrote this, so if it makes no sense, forgive me.

Thursday, October 4, 2007

A Project You Can Help Me With

Some of you know that I recently got "engaged" to my wonderful partner, Lee. We are already committed to each other in our hearts, and that is what really counts, but all sorts of little things that are driving me nuts helped me decide to go against my "anti patriarchy" urges and commit to each other in the eyes of the law as well. Romantic, yes.

At some point we will have a ceremony as an excellent excuse to dress nicely and have a party. There is no date set, but since we are back in the ranks of the two income families, we can plan, at least. And I want to plan to make myself something nice to wear.

I have a vision of me in a dark red silk dress with something lacy and knitted over it, like the item in the photo only white (what IS that pattern??). I am thinking a lace cardigan (perhaps with short sleeves) or a shrug, or maybe a shawl if the dress has sleeves (I will not bare my arms in public!). So, I am soliciting pattern suggestions. Requirements: lightweight, light in color, knitted (though, sigh, I have seen some nice crocheted stuff in Lacis), lace, natural fiber.

Obviously, I need to look in all my books, too, but am afraid I have mostly shawl and scarf patterns. Ugh, I foresee spending a lot of time going through old Vogue, Interweave, Knitters' and such, too.

Suggested Patterns

(These are gleaned from my research, comments to this post, email suggestions and Ravelry suggestions. THANK YOU to all.)


If you have a favorite dainty wedding-like shoulder-covering item, or run across anything as you are looking through the web or your own pattern stash, reading email, or looking through Ravelry, feel free to drop me a comment and let me know what you saw. I will continue to search and evaluate over the next month or two, so don't feel compelled to speak now or forever hold your peace, tee hee!

Wednesday, October 3, 2007

Teaching Knitting: Purls of Wisdom

Back to teaching knitting, today with teaching the purl stitch and everything that goes along with it.

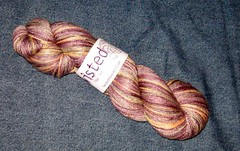
First, an update on my knittin'. Here's a picture of my latest yarn acquisition, Twisted Fiber Arts' Kabam! Organic Stripe in Batty. This is 60% merino, 30% bamboo and 10% nylon. 100% intriguing, especially since it is supposed to subtly self stripe. This was the Etsty Store of the Day on Lime & Violet's Daily Chum, a blog I like to read because all sorts of esoteric things come up on it. I admit to being a sucker for self-striping hand-dyed yarn. This is the second skein of such stuff I have gotten in the last couple of weeks. The other was sKnitches Syncopation Self-Striping in Leaflet, which I got from the Loopy Ewe and was NOT copying some other blogger when I picked that color, honest. I look forward to trying both of these yarns...eventually.

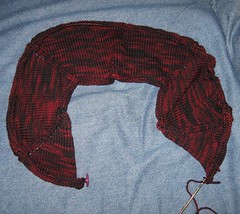
Currently I am still obsessed with Mr. Greenjeans in Red, who is now two rows below the armhole divide. And he seems to fit. I added a repeat of the 6-row increase pattern, because my gauge seems a little tight (though I did swatch!). Now I just hope he is not too big. And that I can magically end up with a multiple of 12 stitches plus 8 for the cable part. I bet I can.

Purling

At some point you need to teach the new knitters to purl. Wisdom differs as to exactly what point that will be. Here are some thoughts to help you decide for yourself:

1. Letting the student complete a garter stitch project first will build confidence, cement the knit stitch firmly in the mind, and guarantee a reasonable looking outcome, which makes new knitters happy. Happy enough to want to come back to learn to purl.

2. Some students get pretty bored with knit, knit, knit. Introducing the purl stitch to them fairly soon after they learn the knit stitch will give them many more opportunities for varied knitting.

3. Introducing the purl stitch too soon may cause some new knitters confusion to the point where they cease to understand the knit stitch and just end up confused. What point is "too soon," you ask? Regrettably, that depends on the student's natural ability and learning style. It's hard to guess--but generally if a student is having physical difficulty making the stitches or remembering the order of the steps, delaying the purl stitch introduction is probably a good idea.

4. Time is a factor. I like the idea of letting the students go home and practice the knit stitch, then introducing purl in the next session of class, which can only happen if you have more than one class with the student. A two-hour class is probably a bit too short to cement both stitches in an average student's mind, though people who crocheted before, learned to knit in their dim past, or happen to be approximately age 14 can probably handle it.

What You Need to Know

Teaching purl is easy and fun. There are a lot of little things that can make it fun for the student, too. It is great to see that light bulb going off over their heads when they realize the mechanics of it all.

1. Tell them purling is "the opposite" of knitting and show them the evidence. I like to show them garter stitch, stockinette stitch samples, ribbing, seed stitch and such, to show how the "bumps" can appear on one side of the knitted fabric or the other, depending on the stitch they make. I explain that in knitting, the bump shows up in the back, because you carry the yarn in the back. In purling, the bump is in the front, because you carry the yarn there. I like to cement that yarn in back/front distinction early and often, since it makes figuring out their mistakes later much easier.

2. Explain how having an evenly distributed number of bumps makes for a fabric that lies flat (show examples) and how putting smooths and bumps all together makes a fabric that curls (show stockinette and ribbing). I do this before teaching purling, because I lot of knitters like to know WHY they need to learn to purl.

3. As with knitting, show the purl stitch on large needles with thick yarn, and slowly. I repeat key words with emphasis. Like "Stick the right needle in FRONT of the left needle, pointing DOWN. Wrap the yarn OVER the needle, then poke it BACK through the loop."

4. At some point I emphasize wrapping the yarn OVER the needle, and tell them how I used to have twisted stitches every other row because I wrapped UNDER and hadn't learned how to compensate. If they are struggling, it helps them to know the teacher was not perfect from Day 1, and if they are thinking, "What would it matter?" they will then know why it does matter.

5. The hardest part tends to be getting situated for the first stitch in a row and the part where you poke the needle backwards (because visually oriented people want to SEE where their yarn is going, and you just sorta have to trust that it is going through.

Once they get purling, encourage them to knit a few rows in stockinette. They tend to love how it looks and how it feels to knit one row then purl a row. Then they will see their knitting curling up. Excellent demo of that feature!

What to Make

This is just me, but I tend to not leave them doing K 1 row, P 1 row very long. I want them to work on a project that will lie flat, for one, and they need to learn a few more skills before leaving the purl class.

I like to have them to a scarf or wash cloth in some variant of a basketweave pattern. We have simple patterns we wrote up for our shop, or you can find something you can use that doesn't infringe on anyone's copyright.

Basketweave is nice because:

1. You get some stockinette sections to admire.
2. It lies flat.
3. You learn to switch between knitting and purling (more on that below).
4. You don't get frustrated moving the yarn back and forth constantly, like you could in seed stitch or ribbing.

Still, any pattern you like that lets them practice both knitting and purling is fine. A dishcloth that makes a picture or something might be a possibility, though that will require teaching how to read a chart!

It's really important to teach students the skill of going between knitting and purling. You need to show them how to set the yarn up for whatever stitch is next, putting the yarn in the back to knit and bringing it to the front to purl, and not doing so over the needle. I demonstrate the "wrong" way and show how they end up with a YO, which would be great if they were doing lace, but they aren't.

Usually at least a few of the students need a little help remembering to move the yarn, and to be shown how to get rid of the accidental YO if they do (just let it drop).

Having a little pattern for them to look at helps those intimidated by patterns relax a bit. I show them the parts of the pattern, and that K = knit and P= purl. We practice reading the instructions. Sometimes I even introduce markers.

More important than markers, though, is learning to "read" the knitting, so they can tell if they should be knitting or purling. It generally makes new knitters feel very confident and accomplished once they realize they CAN do this. I tell them that reading their knitting is a sign they are "advanced beginners" now.

While they knit, I check to see if their gauge is wildly different in one or the other stitch, and if so, give hints for evening that out. I also look for mistakes and show them how to fix them. This is when I also chat them up a bit about stitch patterns--how much you can do with just knit and purl, and let them know what kinds of things they can learn in later classes (or if it's a series, what's coming next).

Of course, always answer questions. Reassure them that it's hard for everyone to talk and count at the same time (this always comes up once students begin to relax and start chatting).

When to Stop

I like to be sure they have done enough basketweave to switch between starting off with knitting and starting off with purling, so they have that experience under their belts before they go home. Teach or remind them how to bind off before you send them home, and let them know how to get help if they end up needing it.

I often give out a handout that lists good beginning knitting books, websites and patterns that the shop sells. I also point them to some free patterns (and tell them which yarns in the yarn shop work great with those patterns--selling yarn is a good thing for your LYS owner!).

Next I'll give some ideas for what to teach next: increases, decreases, cables and more.

Tuesday, October 2, 2007

Knitters' Long-Term Effects

As you can see, I am moving along on Mr. Greenjeans in Red. What appears to be a big blob there is actually the top of the cardigan, heading to the armholes. It's got a very wide top, and that's because a) it has a wider neck than a lot of cardigans and b) there is a pretty wide band of ribbing that goes along the front edge--12 rows.

I just love this Cascade 220 handpaint yarn. It's normal Cascade 220, so it's nice worsted weight wool, but the colors are so pretty. They are more subtle in person than in the photo, I think. It will go so well with much of what I wear!

The title to this post is "Knitters' Long-Term Effects," and I came to that last night while sitting on the couch with Lee, knitting calmly and watching Monday Night Football after my community chorus rehearsal, winding the day down. I was thinking, "This is what I always looked forward to doing when I grew up." Then I remembered how that vision of the future came to be!

It's the influence of someone I don't think about often, but who really had an impact on me as a "slightly troubled teen." Lila Brunell was the lady across the street from us when I was young and lived in Gainesville, Florida. She was a nurse and her husband was the head dietitian at the local VA hospital. They had met in the Navy and had a pretty interesting life--my favorite part was when the lived in Iceland--I loved those stories (which included yarn!). They settled down in Gainesville with their incredibly hyper Basenji dogs at the end of their working careers.

They were really nice to me, and I spent a lot of time over at their house the last couple of years I lived in Gainesville. She was a knitter and helped me with knitting, though mostly at that time I crocheted endless granny squares and embroidering on my jeans (I mean, I was 11-13, OK?). We moved away to horrible (to me) south Florida when I started 8th grade. I was totally miserable. My parents took pity on me and let me go back "home" for two weeks the next summer. They were especially kind to let me visit the Brunells and NOT my grandmother (one mean ole woman). So, I stayed at their house, visited old friends, rode a borrowed bike through all my old haunts, and reveled in being "home" for a while. During the days they were at work, and I read their books (including The Joy of Sex--how convenient it was that they left that out in plain sight). In the evenings, we'd eat, then sit around while Lila knitted and Ralph watched TV. I crocheted along. I remember asking if she ever finished a sweater--she was about at the point I am now with Mr. Greenjeans, and going back and forth on very long rows. She laughed and said she would, but the idea was more to enjoy the making of the sweater.

They were so happy together. Comfortable with who they were and what they were doing. It seemed so warm and pleasant to sit and knit and have nice conversation about current events (with no pesky little brother to bother me). That is when I put it into my mind that when I was grown up, I wanted a nice, warm room where I could sit and knit with someone I loved, feeling relaxed, safe and comfortable--and enjoying the process of my craft.

And now I get to do that! No matter what is happening, I have my warm cozy room, my wonderful yarn and my supportive man at my side. I have arrived at last.

Ralph died when I was a senior in high school. My dad and I drove up to Gainesville for the funeral. It was important to me to be there. I wanted to show Lila that I was going to turn out well, and to thank her for being there for me. She moved away before I went to college, so I didn't get to see her when I returned. That's too bad--she'd have loved all the things I was knitting by then! And I hope her spirit is somewhere appreciating that she had a positive effect on a young girl.

(I had accidentally posted this to my personal blog, then realized it would work there, too, so I have two of the same post--if you read both, don't think you have started seeing double! And if you want to read the other one, ask me and I will give you the URL.)

Monday, October 1, 2007

Completed Surplice Top, etc.


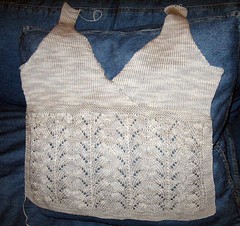
Completed Surplice Top
Originally uploaded by sunasak
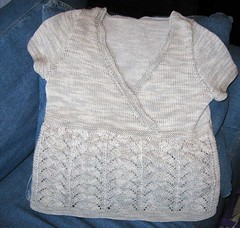
The hated and tedious sewing up is finally complete, so here is the surplice top, before blocking (hence wavy border and lace sections).

As a reminder, this pattern is from Nashua Handknits North Designer Collection #4 and was made in the yarn called for, Natural Focus Ecologie Cotton, in color logwood.

It actually fits, though is low cut enough that I will probably wear it with a cami in public.The color is a bit too close to my skin color to be very flattering, too. But, it's nice and light and for once, not too big. There is a photo of me in it on Flickr and Ravelry, but it's so unflattering that I decided to not put it on my blog. Maybe I'll get another photo once the top is blocked.

At least it is NOT too big and DOES fit. I am proud.

I think Mr. Greenjeans in Red (next project, top down cardigan) will fit fine. I somehow am getting a smaller gauge than usual by going down two sizes, so I will just make the increase section longer and make sure there are the right number of stitches when it comes time to do the cable rib bottom. On that one, I am almost through the yoke on that one, thanks to having a "sick day" yesterday and just sitting on the couch sleeping and knitting. I'll have a picture tomorrow--the black/red color is beautiful.

As for socks, I got halfway up the foot on Diamond Waffle and decided the Knitivity yarn in Redwood did not like it. Too busy a pattern and too busy a yarn. So, the yarn is staying and I am trying Pagoda Lace by the usual Wendy Johnson. I am still on the toe, because I mostly worked on the Greenjeans sweater after frogging the Diamond Waffle sock.

I have decided that the purple-ish J. KnitsNew Jersey yarn would be a better choice for Diamond Waffle. It is more of a semi solid, and I do not have many of those right now. Oh, if only I knew someone dyeing up some semi-solids that I could make socks out of. Oh wait, supposedly I do. DYE SOME YARN, Jody!

I have 34 projects up on Ravelry, and 16 stashed yarns. Lots of typing and photographing still left to do, but I already have found the site handy for looking up official names of patterns and yarns!

Friday, September 28, 2007

Another Pair Off the Needles

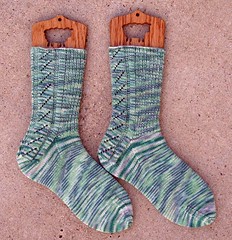
I'm glad I took my time with these socks, because I really enjoyed knitting them, especially the Seacoast Panda yarn, which is so nice and thin, with that lovely bamboo sheen. There are a couple of other pictures on my Flickr pages, so click the link under the picture to see how they look on feet. Walking Away Socks is a really nice pattern. I'll probably make the third variant eventually, too!

I started the Diamond Waffle pattern on Knitty in my Knitivity Redwood sock yarn. That is one complex set of instructions, dude. And why is there a full page photo of the socks? The detail is nice, but it ate all my printer ink. I think I should have looked over the instructions better before printing them out. But, they will look cool, if I can figure out all the various techniques.

Sweater Issues

So, I went home last night, finished these socks, then swatched the Kauni yarn to see if it would work with the Knitting Pure and Simple cardigan I am supposed to teach. The best I can get out of it is 6 stitched per inch, and the pattern wants 5. By the time I added in the stranded pattern, I'd really be changing the pattern like crazy if I tried to use that yarn. I do think I'd rather make a cardigan of the yarn, so I will either find another pattern or make up something.

In the meantime, I realized that Mr. Greenjeans, the next thing I want to make, IS a top-down cardigan pattern, and I already have the lovely Cascade 220 hand painted stuff to make it with! I can just use it to demonstrate techniques for the class--that will be fine! And at least I now know what yarns at the shop are appropriate for the pattern, so I can steer people to them. So, all is well. I don't have to buy yarn after all and can teach the class.

I did not neglect the surplice top yesterday. Both sleeves are complete and I am almost done with the edging around the collar/fronts (just two rows left--I got too sleepy to keep going). Next, whether I like it or not, will come the dreaded sewing in of sleeves and the less dreaded side seams. Then. whoa, I will be DONE! Imagine, a completed non-sock. I'll have something I made to wear to work other than Juliet! I am thinking I won't get to the sewing up until Sunday, when I can concentrate on it (tomorrow, yarn shop then a band contest in the evening). Perhaps I can sneak it in Saturday afternoon so it can block on Sunday.

I have some knitting books coming in the mail and some yarn (bad, bad yarn-buying Suna). I'll report on them and continue the teaching information later! Have a good weekend, readers!

Thursday, September 27, 2007

Teaching Knitting: Ending Your First Lesson


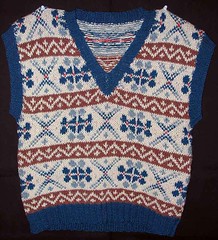
Fair Isle Style Vest
Originally uploaded by
sunasak
Prelude: Checking out Ravelry had me perusing some of the photos I have of older knitted items, and since I've been talking to people a lot about stranded and traditional knitting, I thought I would share this picture of a vest I did in the early 1980s (I know I made it when I was still in grad school). I made this with some wool yarn that I bought on cones at a yarn outlet in Columbus, Ohio. I got a LOT of this stuff, which is very scratchy--probably genuine Shetland--come to think of it, it's probably jumper weight, though it looks like I knit it up at a fairly large gauge. I remember scouring my fair isle patterns in Barbara Walker to see which ones to use, and how scared I was to cut the steeks I'd used on the arms and neck. Yep, other than the gauge this one is pretty traditional!

I don't have all the old things I made--many acrylic items pilled to death. But these wool stalwarts from the scratchy cone yarn are still here, waiting for me to visit somewhere cold!

And am I enjoying Ravelry? Why yes, I am (though I have been so BUSY with other things that I haven't used it as much as I wish). So far I have found it handy for looking up the actual names of yarns I have used, and to see other items made from patterns I have used. I could use more friends on there, so let me know if you are on, or find me if your number comes up! I am SunaSAK!

Last Words before Ending Class

Different beginning knitting classes have different lengths. I wish mine was a series, not just one two-hour class, but I teach what I am assigned, and am grateful for that! No matter how long, you want to be sure to mention a few things before sending the new knitters out of your nest of safety:

1. Show them how to change yarns. If they are making a scarf of a reasonable length, they will need to change yarns. And even if they are making a dish cloth or something smaller, it helps to tell them this early. Encourage them to avoid knots and show them a couple of options, such as:

a. Knitting with the old and new yarn for a few stitches then weaving the ends
in (works well except for color-changing yarns and some delicate ones where
this becomes too obvious).

b. Changing at the end of the row with a very loose knot and unknitting then weaving in later

c. Spit splicing if they are using wool and you are brave enough to show that.

d. The "Russian Join" if you know that. Just don't tell them TOO many options. They are probably already overwhelmed.


2. Show them how to bind off. I often get them to bind off a few stitches, then un-do those for them. It helps to have done it a couple of times. I refer them to web sites with instructions, so they can remind themselves.

3. Give them any handouts you have made, from places to get patterns to online instructions to help them if they forget.

4. Tell them they can come back for help at any time (if that is your store policy, for store-based teachers). It's in the shop's best interest: returnees tend to buy more yarn!

5. Ask them to do their best to knit at least for a little while every day until they are sure they have it all down pat. Say, "If you don't reinforce what you have learned, you may well forget, or have to come back to be reminded. If you knit every day for a week, knitting will be imprinted on your brain and you will always have the skill. Really."

6. And finally, remind them that knitting is supposed to be a fun and relaxing hobby, not frustrating work. Encourage them to come back for more help If they get frustrated.

Don't forget to thank them and let them know how to contact you later, too. You might get repeat business!

Next: purling and stitch patterns.

Tuesday, September 25, 2007

Ravelry Invite Came--Don't Let Me Get Too Sucked In

The above says it all.

I am SunaSAK on there. That's because I am sunasak on practically everything.

I haven't set anything up yet, but will later today.

If you aren't on, they appear to be moving really quickly now, so you'll be on soon. They are letting the huddled masses on now!

Monday, September 24, 2007

Knitting the First Row (and surplice progress)


Surplice Top Front
Originally uploaded by sunasak

Finally, the new knitter will get to take a stitch today.

But first, I am relieved to say that the front of the Ecologie Cotton surplice top is done. I am so glad I made it all in one piece--it was very easy to pick up stitches in the back loops where the two sides overlap, and you can't see it at all from the front. It still looks a little wonky on the neck edges, but that's because there will be a nice border picked up on those edges once the front and back are sewn together.

I got a good start on the first sleeve, too, which just makes me dread sewing in the sleeves. I remind myself that I am much better at that now, so I will be positive! Holding the top up to me, I think it will fit very well. I sure hope so. It's many hours' worth of knitting!

Knitting the First Row

Once you have taught the knitted cast-on, it's easy to show students how to knit. You repeat to them that you stick the needle in, just like you did before, you wrap the yarn, just like you did before, you get a loop on the right needle, just like you did before... BUT instead of putting the loop back on the left needle, you leave it on the right and slide the original stitch you poked into OFF the left needle.

I demonstrate it slowly, but smoothly a couple of times, with them watching only, then I assure them that it won't look that smooth the first time or two for them, and that their fingers might need to help them a bit. I point out how much easier it is if you work close to, but not at, the ends of the needles.

Next, I let them try, and go to each person individually to watch and assist. Again, I try to watch the person who seems to have the most trouble first. It encourages the others to hear me say, "Yes, you did it!" to that person. Even if someone seems to have caught on, watch him or her knit a few stitches, in case the technique is off (wrapping the wrong way or something).

Things to watch for:

1. Stretching the knitting out. Some people pull hard on the knitting and get their needles very far apart. This stretches out their stitches and makes it hard to slide the stitches off, too. Show them how to work in closer. I have seen MANY light bulbs go off in people's heads when I encourage them to not pull so much.

2. Finishing the stitch on the point of the needle. This can cause the student to lose stitches easily, and also invariably leads to tight knitting. Show the student how to finish the stitch on the shank of the needle (the widest part) so that the stitch forms around that part. Stitches will slide more easily and be easier to knit into on the next row.

3. Not doing the steps in order. This mostly happens with very young students, but can happen to anyone. Often "sliding off" gets omitted, but sometimes they will wrap twice, too. You can repeat the steps however you like to, to help them remember. I usually say, "In, wrap, poke, off." Or something like that.

4. Yanking the yarn very tight at the end of each stitch. This will lead to tight knitting too. Some people don't need to snug up the yarn at all, while others need to give just a little tug to get nice, medium knitting.

5. Not tightening the yarn at all. You will sometimes find people creating very loose stitches (especially the pullers in #1). Tell them they get to snug up their yarn a bit.

Leave them alone to bond with their knitting, but ask that they let you know when one row is done.

After Row 1

When each student finishes the first row, take a look at it. Turn it to the back and show them how there is a nice line of bumps with a loop coming out of them across the back. If there is a mistake, show them how they can tell there is one--there will be something different in there--a spot with two loops coming out of one bump, or a loop with no bump, or a sideways loop (that's an extra YO).

If there is a mistake, tell them you'll help them fix it when they get to that stitch on the next row. If there are no mistakes, be very happy and congratulate them on a row of perfect knitting. Wow, they are great!!

Row 2

Don't let them start row 2 without this vital demo: avoiding the dreaded ever-widening scarf. This will lead to a lifetime of happy knitting!

Show each student how to position the yarn to knit a new row. Pull the yarn down and behind the knitting, and show them how they can see the bump from each previous stitch on their needles, including the last one.

Then pull the yarn over the needle, and show how you can create what appears to be TWO stitches from that last stitch by doing this. Say if you take that last stitch and make it two, your item will get wider and wider as you knit. Most people will nod their heads, having seen scarves that got wider and wider made by other new knitters. Tell them that by carefully pulling the yarn down before each new row, this will never happen to them. And remind them they can count the stitches in each row to be sure they haven't added any--it's a good idea at first.

If there are mistakes in the first row, show the students how to avoid the kind of mistake they make (each person usually messes up in one or two ways, at most). You can also show them how to fix their own mistakes, though they won't probably be able to do it at first.

Cheer them up by pointing out that almost every "mistake" they make is something they will later do on purpose as a "technique." Tell them they are making "garter stitch" and that it is knitting every row. When they are all involved in knitting, you can explain the properties of garter stitch and why it is good (lies flat, is stretchy, makes variegated yarn look more broken up).

What to look for in mistakes:

1. An extra wrap. Some people tend to get confused and wrap their yarn between stitches. This of course is a yarn over, and a good thing, just not in a garter stitch project. It is easy to spot an extra wrap because it will look slanted on the needle. A properly formed stitch stands up straight. How to fix: the easiest way to fix these is to just drop the wrap, and snug up the surrounding stitches, which will be rather loose.

2. Knitting into the stitch below. Sometimes the needle goes too far under and the student knits into the stitch below the right one. This would make lovely fisherman's rib, but will bunch up their knitting. You can spot this when you see two loops rather than one in the bump for a stitch. To fix: drop the stitch and re-knit it as two. In garter stitch this isn't particularly elegant, but show them how, for later use.

3. Knitting between stitches. Sometimes the student will "miss" the loop and knit between two stitches. They will end up slipping a stich to the right needle, with a YO attached. To fix, let the YO fall and it will look like a dropped stitch. Repair as for a dropped stitch.

4. Dropped stitches. Remind them to NOT pull if they drop a stitch, so that the loops don't unravel farther. Then show them how to fix the dropped stitch. If nothing has fallen out, they can just put the stitch back on the left needle and proceed!

5. Loose first stitch. A lot of new knitters totally panic when they see the first stitch of a row come out very loose. Reassure them that it is not uncommon nor the end of the world. Remind them to knit the first and last stitches snugly and to not pull when doing the first stitch on a row.

6. Forgetting to slide the yarn off the left needle. It's easy to spot this one--your student won't be able to move the needles. Explain to them that you need to remember that final step--sliding the yarn off the left needle, and remind them to not stop in mid-stitch (that is how this often happens). Fix the problem for them--they won't do this often once they get the hang of making a stitch.

If other kinds of mistakes happen that you can't figure out, you may need to demonstrate tinking. (Un-knitting.) I prefer to show students how to tink one stitch at a time, by sticking the right needle into the stitch below and then pulling the yarn out to remove the stitch. This puts the yarn back on with the right orientation. Unraveling is fast, but putting the yarn back on the needles takes time, and it's hard to remember how to put them on "facing " the right way.

Let the students knit a while. They will be working to smooth out their technique and to see what kinds of errors (if any) they tend to make.

Your job is to not blanche if students knit "funny." Just observe. You see a lot of interesting ways of holding needles and yarn. If what they do produces a nice, even knit stitch, let them be. There is more than one "right" way to knit. And if someone really, really wants to hold the yarn in their left hand, show them continental knitting. I do have an occasional student, however, who likes to "throw" but with the left hand. Some get quite good at it!

Some new knitters put a lot of extra motion in to knitting. Most will smooth out and become more econimical with time. Ask them to watch each other and you to see different ideas for knitting. The first day is a good time to try different ways of holding the needles and yarn, before you are "set in your ways."

While they are knitting is a good time to mention some handy hints and information:

  • Learn to relax the hands and arms while knitting will prevent carpal tunnel and is a good thing. Tell them they can expect to relax once they get the hang of it.
  • They are making garter stitch, which is knit (or purl) every row. This stitch is very useful for making scarves or other items that need to be flat. Explain the wonders of garter stitch.
  • Don't stop in the middle of a stitch (see #6 in mistakes). You can easily forget where you are and knit an extra stitch. Always complete a stitch before chatting, answering the phone, etc.
  • Don't end your knitting session in the middle of a row. This will keep from stretching our your knitting in the middle. If you must put down your knitting because the phone rings, a child screams, or whatever, remember how to start again: the yarn should hang from the back on your RIGHT needle. And remember, the last stitch you knit is always the one with the yarn hanging off it.
  • If you pick up to knit and start with the yarn on your LEFT needle, you will make a short row, which is a "technique" but not what you want to do. You will end up with more rows on one side of your project than the other, plus a hole where you turned around. Unknit until you get back to where you started, move the needles to the correct position (yarn is hanging from RIGHT needle, and start again!
    IDEA: I sometimes do a drill and say briskly, "RING RING" in the middle of their quiet knitting time. I tell them to put down the knitting right now and pick up their phones! Then I say to pick the knitting back up and figure out how to start again. It's a good reminder and somewhat fun.


Note: I think some of my explanations above may be clear as mud. Let me know if you have a more elegant way to describe the errors or to fix them. And let me know if I forget a common mistake!

Next: What to say before the first class ends (if you aren't teaching purl)

Friday, September 21, 2007

Refresh My Memory...


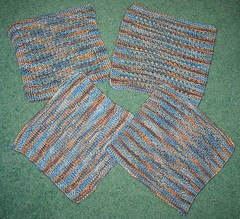
Dishcloths for my sister
Originally uploaded by sunasak
Since neither project I am currently working on looks any different from a picture I already posted (that would be the beginning of my second green Walking Away Sock and the front of the surplice top, which has all the lace panel and about 1/3 of the first surplice done), I am sharing the only photo I can find of something that passes for a beginning knitting project: the dishcloths I made my sister for Christmas last year.

OK, so I made them from Schaeffer cotton yarn that retails at nearly $40 a skein, so they aren't beginner Sugar-n-Cream models, but they are simple knit-and-purl patterns. Loved the yarn, by the way. Made very sturdy cloths with a bit of sheen. All I can remember is that I had so much going on (sudden pick up in love life, for one) that it took me way longer to make 4 discloths than I had hoped--the Flickr site reveals I took this photo on December 25, so I must have not finished until the day I gave them away! I have leftover yarn enough for another, too, which would make the expensive skein actually crank out $4 dishcloths after all.

But, here is my dorky question. I got to yet another set of instructions (in the Nashua pattern book for the surplice top) telling me to decrease X number of stitches "evenly spaced" across the row. WHY can't they say "decrease every X stitches" so you'd know how often to decrease? Why do we have to figure that out for ourselves? And, have I forgotten the "magic" way to calculate this (I am just sure I read such a thing once). I know that if you decrease once on each end, that takes care of two of them. But what's the formula for figuring out how many stitches to put between each decrease?

Or, do they say this mainly because you have to do is somewhat irregularly? On mine if I knit the first two together and then K5, K2tog to the end, I came out with two few decreases. I ended up doing them on the next row, hoping the Knitting Police would not come by and see. I must have done that on the other side, too, but it was in June, so I forgot.

I am feeling a bit dim, but willing to learn (not willing enough to post this question to an email list, though).

I have a LOT of knitting time tonight and over the weekend, so I am hoping to make good surplice and sock progress. And I am working on the next beginning knitting teaching tips, too!


UPDATE: Woo! Post and you shall receive! The kind and gracious Katie K has posted in the comments this helpful link to a calculator that will answer my questions (and yours, if you also wonder how to calculate decreases). Thanks to the Knitting Fiend for making this calculation helper, too. I just love the blogosphere and its helpful residents.

Thursday, September 20, 2007

Teaching the Cast On

Welcome to the next in my series of posts on teaching beginning knitting. Previous posts are in the sidebar, or you can find them by searching for "teaching ideas." Eventually, I'll put them all together.

Now we are finally into teaching new knitters how to DO something! Here are my tips for teaching the knitted cast on. Your mileage may vary, yadda yadda.

But Wait!

Before we get moving set some expectations. Ask how many in the class learned to knit years ago but think they have forgotten. Ask how many know how to crochet. Ask how many are between the ages of 12 and 17. Tell the class not to be surprised if these students seem to pick things up more quickly and not to be discouraged by that. Many times the knitting skill comes right back to people who think they have forgotten how. Crocheters are used to manipulating needles and yarn, so they often pick up knitting quickly. And for some reason, the teenage brain is hard-wired for knitting acquisition and many teens just take off with very little instruction (I have had to slow some down, because they start going so fast they get sloppy).

Gently remind people with known issues (tremors, bad arthritis, brain injuries, known small motor skill issues) that they might take longer to get the hang of knitting. But, that is just fine. Knitting is not a race. It is a life-long avocation, so it is not really important how long it takes to learn--it's just great to learn. And knitting is often great therapy if you do have an issue with your hands or coordination.

I usually point out cheerfully that I have never failed to get someone knitting, which is the truth. (I do think there may be one or two who didn't keep it up, but they did at least make some stitches.)


Demo Equipment

A word about the equipment you use to teach. I like to use size 19 needles (I use Bryspun because they have some "grip") and super bulky yarn. We have used the same ball of pink "Big Baby" Acrylic for over a year at the yarn shop, and it's taught both knitting and crochet! I also use it as an example of how some acrylic doesn't feel all that pleasant to the touch.

OK, Now the Slip Knot

First ya gotta do a slip knot. I am always surprised at how few people know how to do this. I find it easiest in a group setting to teach this like you would for a small child.

1. Lay your yarn on the table and make a loop with the free end on top. Have just a few inches of yarn before the loop.
2. Take the yarn end that is attached to the skein or ball and push a loop of it through the loop on the table.
3. Grasp what you pushed through in one hand and the free end in the other hand and gently pull.
4. You will have a knot that will slide up and down the end attached to the skein.
5. Place this loop on a knitting needle and gently tighten.

Here is where I then explain how you want the loop to be loose enough to slide up and down the needle easily, but tight enough that you don't see a lot of "daylight" around the loop. I sat that is the tension you will aim for in all your knitting.

Notes on the Cast-On

Next you will show the students how to cast on. I usually don't tell them it is called the knitted cast-on at first--I let that be a happy surprise when they later realize they already know most of the steps to knitting. I point out that all knitting consists of is loops building upon loops. In order to start, you need more than that one pitiful slip knot as loops. That's why you cast on--you need that first set of loops.

1. First I slowly demonstrate a cast on stitch. I position myself where everyone can see my hands and the yarn. I ask them to set their needles down and watch, because I've found that if they hold their needles, they try to follow along, which of course means they look at their needles, not mine, and miss something. I let them follow on the second or third demo.

2. I stick the right needle in the slip knot and say remember this direction. You are poking it UP and sticking the new needle BEHIND the one with the knot. You will do this over and over.

3. When I wrap, I point out the yarn is going left to right, and that I try to "snug" the yarn between the two needles, because that makes the next step easier.

4. I admit that poking the yarn through the loop already on the needle is the biggest challenge. I tell them that they need to feel free to use their fingers to move the needles and hold the yarn in place. I demo that my index finger helps me move the right needle into position to move the yarn through the loop. I also reassure them there is more than one way to accomplish this maneuver, and that their fingers are more than welcome to help at first.

5. I tell them to pull the new loop toward their chest, to make a nice big loop to put back on the right needle. (If they ask if they should twist it or not, tell them it works either way, just be consistent.) Then I say later they won't need to pull so much yarn out. I stress that when you put the new loop on the right needle, you need to "snug" it, not "tighten" it, because you want to make it easy to get the needle back in for the next stitch.

As I demonstrate, I make sure to show them each step clearly as well as to articulate it, giving whatever mnemonics seem to help. This addresses people who learn best by seeing and those who learn best by hearing. I address the people who learn by doing in step 6. That hits most of the standard learning styles, giving everyone a chance. I also have the information written down in handouts, for people who like to read instructions.

Hint: a question that usually comes up is, "Why is the last loop I put on sideways? It looks different!" You can explain that in this cast on, the newest loop always slants, but straightens right up when you put a new loop on. It's normal.

6. After showing them a couple of times, I look around at the panicked expressions and say I will now help each of them get started. Then they look relieved. Those who "get it" are encouraged to go ahead and put X number of stitches on, or to help their neighbor--I explain that one really good way to learn something well is to teach someone else. Then I go around the group. I try to start with the most frightened looking student. I figure if they get going, everyone else will feel better. I usually only have to help for 3-4 stitches and they get it. If not, I move on and come back.

Hint: You will have people who don't care what their cast-on stitches look like, and others who get upset if they have a slightly bigger loop in one spot or another. For the second bunch, encourage them to start again as many times as they like. They'll remember better later. For the others, if they decide their cast on looks icky after they've knitted a few rows, extol the virtues of fringe on a scarf. It hides that.

OK, until I think of something I have missed, that's it for teaching the cast on. Next: we let them knit something.

Wednesday, September 19, 2007

Lucy Bag for Crochet


I was asked on a non-knitting email list if it was possible to crochet a Lucy Bag, since there are members of the list who simply don't want to learn to knit (picture is a sample of one I knitted). Also one of them has great difficulty with commercial instructions, so they wanted it "conversation style." Here is what I came up with. If you spot any obvious flaws, let me know. These are more "guidelines" than instructions, but might be useful to someone!

Lucy Bag for Crochet

Using 100% NON superwash wool, crochet a flat circle that is 1/3 larger than the ultimate diameter you want. I'd probably double the yarn and use like an I hook, double or maybe half double crochet. You want there to be spaces so that the felting happens better. It will look loose.

After you hit the diameter, stop increasing and just crochet along with the same number of needles. The sides will start forming. Make it 1/3 longer than you want in the end.

For the handles, I'd eyeball them. Pick up about 15 or so stitches at one point and make a rectangle 10 inches long. Attach the second end of it about two-three inches away from the first, making a fairly short loop. Then on the other end of the bag, sort of parallel, pick up the same number and crochet a 40-inch rectangle (these are the lengths from the knitting pattern). Attach that one a few inches from the first. Viewing a clock face as your circular bag, the attachments would be like at 11 and 1 on the clock and at 5 and 7 on the clock.

Felt the bag by washing in very hot water in a top-loading machine, highest possible agitation. You may need to run it through more than one cycle. To reduce lint, you might want to put the article in a pillowcase, securely fastened, but that makes it harder to check how felted the bag is.

To fasten, the long loop passes through the shorter one, then you can wear it on your shoulder.

The above is not based on actually crocheting one of these. Just an educated guess.

Copyright 2007 by Sue Ann Kendall. Thanks to Jodie Lucas for input.

And if you knit, buy a copy of the Lucy Bag pattern. It's by Two Old Bags and can be found many places on the Internet.