
Finally, the new knitter will get to take a stitch today.
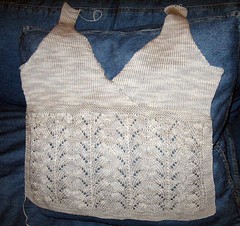
But first, I am relieved to say that the front of the Ecologie Cotton surplice top is done. I am so glad I made it all in one piece--it was very easy to pick up stitches in the back loops where the two sides overlap, and you can't see it at all from the front. It still looks a little wonky on the neck edges, but that's because there will be a nice border picked up on those edges once the front and back are sewn together.
I got a good start on the first sleeve, too, which just makes me dread sewing in the sleeves. I remind myself that I am much better at that now, so I will be positive! Holding the top up to me, I think it will fit very well. I sure hope so. It's many hours' worth of knitting!
Knitting the First Row
Once you have taught the knitted cast-on, it's easy to show students how to knit. You repeat to them that you stick the needle in, just like you did before, you wrap the yarn, just like you did before, you get a loop on the right needle, just like you did before... BUT instead of putting the loop back on the left needle, you leave it on the right and slide the original stitch you poked into OFF the left needle.
I demonstrate it slowly, but smoothly a couple of times, with them watching only, then I assure them that it won't look that smooth the first time or two for them, and that their fingers might need to help them a bit. I point out how much easier it is if you work close to, but not at, the ends of the needles.
Next, I let them try, and go to each person individually to watch and assist. Again, I try to watch the person who seems to have the most trouble first. It encourages the others to hear me say, "Yes, you did it!" to that person. Even if someone seems to have caught on, watch him or her knit a few stitches, in case the technique is off (wrapping the wrong way or something).
Things to watch for:
1. Stretching the knitting out. Some people pull hard on the knitting and get their needles very far apart. This stretches out their stitches and makes it hard to slide the stitches off, too. Show them how to work in closer. I have seen MANY light bulbs go off in people's heads when I encourage them to not pull so much.
2. Finishing the stitch on the point of the needle. This can cause the student to lose stitches easily, and also invariably leads to tight knitting. Show the student how to finish the stitch on the shank of the needle (the widest part) so that the stitch forms around that part. Stitches will slide more easily and be easier to knit into on the next row.
3. Not doing the steps in order. This mostly happens with very young students, but can happen to anyone. Often "sliding off" gets omitted, but sometimes they will wrap twice, too. You can repeat the steps however you like to, to help them remember. I usually say, "In, wrap, poke, off." Or something like that.
4. Yanking the yarn very tight at the end of each stitch. This will lead to tight knitting too. Some people don't need to snug up the yarn at all, while others need to give just a little tug to get nice, medium knitting.
5. Not tightening the yarn at all. You will sometimes find people creating very loose stitches (especially the pullers in #1). Tell them they get to snug up their yarn a bit.
Leave them alone to bond with their knitting, but ask that they let you know when one row is done.
After Row 1
When each student finishes the first row, take a look at it. Turn it to the back and show them how there is a nice line of bumps with a loop coming out of them across the back. If there is a mistake, show them how they can tell there is one--there will be something different in there--a spot with two loops coming out of one bump, or a loop with no bump, or a sideways loop (that's an extra YO).
If there is a mistake, tell them you'll help them fix it when they get to that stitch on the next row. If there are no mistakes, be very happy and congratulate them on a row of perfect knitting. Wow, they are great!!
Row 2
Don't let them start row 2 without this vital demo: avoiding the dreaded ever-widening scarf. This will lead to a lifetime of happy knitting!
Show each student how to position the yarn to knit a new row. Pull the yarn down and behind the knitting, and show them how they can see the bump from each previous stitch on their needles, including the last one.
Then pull the yarn over the needle, and show how you can create what appears to be TWO stitches from that last stitch by doing this. Say if you take that last stitch and make it two, your item will get wider and wider as you knit. Most people will nod their heads, having seen scarves that got wider and wider made by other new knitters. Tell them that by carefully pulling the yarn down before each new row, this will never happen to them. And remind them they can count the stitches in each row to be sure they haven't added any--it's a good idea at first.
If there are mistakes in the first row, show the students how to avoid the kind of mistake they make (each person usually messes up in one or two ways, at most). You can also show them how to fix their own mistakes, though they won't probably be able to do it at first.
Cheer them up by pointing out that almost every "mistake" they make is something they will later do on purpose as a "technique." Tell them they are making "garter stitch" and that it is knitting every row. When they are all involved in knitting, you can explain the properties of garter stitch and why it is good (lies flat, is stretchy, makes variegated yarn look more broken up).
What to look for in mistakes:
1. An extra wrap. Some people tend to get confused and wrap their yarn between stitches. This of course is a yarn over, and a good thing, just not in a garter stitch project. It is easy to spot an extra wrap because it will look slanted on the needle. A properly formed stitch stands up straight. How to fix: the easiest way to fix these is to just drop the wrap, and snug up the surrounding stitches, which will be rather loose.
2. Knitting into the stitch below. Sometimes the needle goes too far under and the student knits into the stitch below the right one. This would make lovely fisherman's rib, but will bunch up their knitting. You can spot this when you see two loops rather than one in the bump for a stitch. To fix: drop the stitch and re-knit it as two. In garter stitch this isn't particularly elegant, but show them how, for later use.
3. Knitting between stitches. Sometimes the student will "miss" the loop and knit between two stitches. They will end up slipping a stich to the right needle, with a YO attached. To fix, let the YO fall and it will look like a dropped stitch. Repair as for a dropped stitch.
4. Dropped stitches. Remind them to NOT pull if they drop a stitch, so that the loops don't unravel farther. Then show them how to fix the dropped stitch. If nothing has fallen out, they can just put the stitch back on the left needle and proceed!
5. Loose first stitch. A lot of new knitters totally panic when they see the first stitch of a row come out very loose. Reassure them that it is not uncommon nor the end of the world. Remind them to knit the first and last stitches snugly and to not pull when doing the first stitch on a row.
6. Forgetting to slide the yarn off the left needle. It's easy to spot this one--your student won't be able to move the needles. Explain to them that you need to remember that final step--sliding the yarn off the left needle, and remind them to not stop in mid-stitch (that is how this often happens). Fix the problem for them--they won't do this often once they get the hang of making a stitch.
If other kinds of mistakes happen that you can't figure out, you may need to demonstrate tinking. (Un-knitting.) I prefer to show students how to tink one stitch at a time, by sticking the right needle into the stitch below and then pulling the yarn out to remove the stitch. This puts the yarn back on with the right orientation. Unraveling is fast, but putting the yarn back on the needles takes time, and it's hard to remember how to put them on "facing " the right way.
Let the students knit a while. They will be working to smooth out their technique and to see what kinds of errors (if any) they tend to make.
Your job is to not blanche if students knit "funny." Just observe. You see a lot of interesting ways of holding needles and yarn. If what they do produces a nice, even knit stitch, let them be. There is more than one "right" way to knit. And if someone really, really wants to hold the yarn in their left hand, show them continental knitting. I do have an occasional student, however, who likes to "throw" but with the left hand. Some get quite good at it!
Some new knitters put a lot of extra motion in to knitting. Most will smooth out and become more econimical with time. Ask them to watch each other and you to see different ideas for knitting. The first day is a good time to try different ways of holding the needles and yarn, before you are "set in your ways."
While they are knitting is a good time to mention some handy hints and information:
- Learn to relax the hands and arms while knitting will prevent carpal tunnel and is a good thing. Tell them they can expect to relax once they get the hang of it.
- They are making garter stitch, which is knit (or purl) every row. This stitch is very useful for making scarves or other items that need to be flat. Explain the wonders of garter stitch.
- Don't stop in the middle of a stitch (see #6 in mistakes). You can easily forget where you are and knit an extra stitch. Always complete a stitch before chatting, answering the phone, etc.
- Don't end your knitting session in the middle of a row. This will keep from stretching our your knitting in the middle. If you must put down your knitting because the phone rings, a child screams, or whatever, remember how to start again: the yarn should hang from the back on your RIGHT needle. And remember, the last stitch you knit is always the one with the yarn hanging off it.
- If you pick up to knit and start with the yarn on your LEFT needle, you will make a short row, which is a "technique" but not what you want to do. You will end up with more rows on one side of your project than the other, plus a hole where you turned around. Unknit until you get back to where you started, move the needles to the correct position (yarn is hanging from RIGHT needle, and start again!
IDEA: I sometimes do a drill and say briskly, "RING RING" in the middle of their quiet knitting time. I tell them to put down the knitting right now and pick up their phones! Then I say to pick the knitting back up and figure out how to start again. It's a good reminder and somewhat fun.
Note: I think some of my explanations above may be clear as mud. Let me know if you have a more elegant way to describe the errors or to fix them. And let me know if I forget a common mistake!
Next: What to say before the first class ends (if you aren't teaching purl)
You are a good teacher, I can see that / read that. I presume you are most patient...
ReplyDeleteAnd I love the surplice top!!!!
Hi1 I just found your comment on my Surplice Lace Top (Thanks!). Looks like you had no problem doing it in one piece - I can't wait to see it finished!
ReplyDelete